The Chemistry of Making Jam

It is early autumn. Your fridge and freezer are overflowing with raspberries, black berries and other berries you have collected over the summer. What to do to make room? Make jam! Besides preserving fruits and berries, it is also great fun with some interesting chemistry involved. You can see the result of my first attempt to make jam from black berries I picked during late summer in the image above.

What do you need to make jam? You will need equal amounts of fruit and sugar in weight. I will refer to a recipe used for 1 kg of fruit and 1kg of sugar. The task of the sugar is to bind water and draw it away from the fruit. With no water available, no mould will be able to grow on jam which causes the preserving effect. As you can see, it is important to use enough sugar, but too much of it will lead to the formation of sugar crystals. In addition, acidity is needed, so the jam can set properly. Fruits naturally contain some acids, but more will have to be added for certain fruits like berries to reach the perfect pH for jam to set, which is at 2.8 to 3.3. To reach this pH-value, you can either add citric acid or use jam sugar where citric acid is already contained. I chose another method and added the lemon juce pressed from one lemon which naturally contains a lot of acid.

What happens after mixing together fruit, sugar and acid? The mixture is first heated and stirred until all the sugar has dissolved and the boiling point is reached. Then continue to boil gently for 15 to 20 minutes. What happens now is that the pectin molecules, which consist of long chains of sugar molecules linked together, react with each other to form a network of long chains. This reaction happens at 104.5 degrees Celsius and it gives jam its gel-like texture. Fruits contain pectin, but in different amounts. For example black berries that I chose to make my jam do not contain enough pectin to form a gel. In this case, jam sugar can be used, which contains pectin additionally to the citric acid. It is also possible to add one fruit that is high in pectin to the jam making process, which could be an apple or a citrus fruit. Instead, I decided to add four table spoons of grated lemon zest, which also contains pectin. In fact, pectin added to jam sugars is made from the peels of citrus fruit.

The jam is ready to pour into jars, when enough pectin molecules have reacted to form the gel-network. You can test when this point is reached by taking some of the jam up with a cold spoon and letting it cool. Then observe how the jam moves when you move the spoon around. It should just stick to the spoon and stay in one place, when the pectin network has set sufficiently. Make sure, to wash your glass jars with soap and hot water before using them. You can even heat them in an oven at 160 degrees Celsius for sterilization. To create a vacuum inside the glas jars, put them into a pan with hot water before filling them. Pour the jam into the jars when it is still hot, then screw the lit on and remove them from the hot water bath. As the glass jars cool, the vacuum will slowly come on. This is yet another precaution, to make the jam last as long as possible.

Making jam proved to be great fun for the chemist, the food enthsiast and the environmental activist inside me. It is a great way to preserve locally grown berries and fruits for the winter which is  much more environmentally friendly than buying berries in winter that have come all the way Chile or New Zealand. It is also better than having jam from a supermarket of which you have no idea where it comes from and under which conditions it has been been made. In addition, I found that opening a glass of my own home-made jam is far more exciting and satisfying.

What are Ionic Liquids and what are they good for?

Image: An ionic liquid tested for the application in lithium-ion batteries at Chalmers University of Technology Gothenburg and Uppsala University (Sweden).

Ionic liquids are basically salts with low melting points of under 100 degrees Celsius. Some might pause now because in school we are normally taught that salts have very high melting points. This is true for most – let us say – ”common” salts as for example table salt with the scientific name sodium chloride (NaCl). Sodium chloride has a melting point of 801 degrees Celsius which I guess can be considered a high melting point.

Salts consist of positive and negative ions that attract each other electrostatically which results in the formation of ionic bonds. This is how they form the compounds that we know as salts. Sodium chloride contains positive sodium ions and negative chloride ions. The strong attraction between the positive and negative charges causes the high melting points we observe in most salts.

Nevertheless, salts with low melting points and ionic liquids do exist. Why is that? The melting points of a salt are generally lower, the larger the ions are that it is made up from. For example, when changing the positive ion ( also called cation) in sodium chloride from sodium to the bigger rubidium ion, the salt rubidium chloride is obtained which has a melting point of 715 degrees Celsius. The melting point of rubidium chloride is 86 degrees Celsius lower than that of sodium chloride because the rubidium ion is bigger. When choosing even larger postive ions, for example the organic cation 1-ethyl-3-methyl-immidazolium, a salt called 1-ethyl-3-methyl-immidazolium chloride (a real tongue breaker) is obtained which has a melting point of only 89 degrees Celsius. This salt is an ionic liquid which melts under 100 degrees Celsius. We arrived at this ionic liquid simply by exchanging the positive ion (cation) with larger ones.

Also, the negative ions (also called anions) – the chloride ion in our case – can be exchanged with larger ones. When switching from the chloride ion to the organic anion bis(trifluoro methane sulfonyl) imide (another tongue breaker), the melting point can be lowered even more. When putting together the anion bis(trifluoro methane sulfonyl) imide with the cation 1-ethyl-3-methyl-immidazolium a salt with a melting point of -15 degrees Celsius is obtained. This salt (I will spare you the name) is a room temperature ionic liquid (RTIL). This is indeed a salt which is liquid at room temperature.

So, why do chemists make liquid salts? I admit a salt that melts at a lower temperature than water is pretty cool, but are they good for anything? To answer this question, we have to first look at the properties. The most important properties of ionic liquids are that they can conduct electricity due to their mobile ions and that they are stable even at high temperature which also means that they are non-flammable and cannot easily catch fire. Especially, their good high-temperature staibility makes ionic liquids interesting for many applications, for example as high-temperature lubricants in machines or as solvents for chemical reactions in the industry. Due to the conduction of electricity, ionic liquids are also tested in solar cells and batteries.

I have talked to Manfred Kerner, a PhD student in the Applied Physics Group at Chalmers University of Technology in Gothenburg (Sweden) who is working on the application of ionic liquids in batteries. Kerner is trying to use ionic liquids as the electrolyte (= the liquid placed between two battery electrodes) in lithium-ion batteries. One big problem lithium-ion batteries face is the high flammability of commonly used electrolytes which is a part of the reason for many youtoube videos showing laptops on fire. Ionic liquids can be a solution to this problem because they are stable at high temperatures and do not catch fire, while they are able to conduct electricity. These properties are especially useful for high-temperature lithium-ion batteries which run at temperatures higher than room temperature and are popular in hybrid electric vehicles.

Nevertheless, Kerner admits that there are still some hurdles to overcome until ionic liquids can be broadly applied in batteries. One example is their high cost. Another is that ionic liquids strongly attract water from air which damages the electrode materials of lithium-ion batteries. For this reason the use of controlled water-free environments such as gloveboxes is necessary. In addition, ionic liquids are not stable in contact with all the possible battery electrode materials which limits their use.

Despite these drawbacks some ionic liquids are already on the market as electrolytes for batteries according to Kerner. However, they are so far mainly limited to research applications. Nevertheless, some day in the future we might find ionic liquids in our own laptop or car batteries.

Can we see atoms?

Image credit: Pixabay 2017.

photos of atoms

Background

There is a large number of physical and chemical techniques available today for the analysis of substances. They provide the opportunity to gain information about the properties of atoms, molecules and ions. Infrared spectroscopy, for example, measures the vibrations of molecules. Mass spectrometry, which is widely known from TV crime dramas, gives information about the weight of molecules or ions. This information about mass can then be used to identify poisons, drugs and other substances.

However, most techniques cannot give us a direct picture of what atoms, molecules or ions really look like. Normally, conclusions about their looks are drawn from measured properties. Imagine you are drawing a picture of a house while somebody is telling you about its appearance, but you cannot see it yourself. This is how physicists and chemists use the information from their measurements to figure out what atoms, molecules and ions look like. The measurements are giving them information about substances, which corresponds to the information about the house, such as colours; size or where doors and windows are.

But are there any methods that can provide us with – let us say – a photo of an atom? The main problem is that atoms are extremely tiny. One atom in an apple is as small as the apple itself is compared to our entire Earth. Nevertheless, there are a few methods that can indeed capture pictures of atoms with the help of quantum mechanics and other cool science. A few of these methods are listed below.

Transmission electron microscopy (TEM)

Atoms cannot be seen under normal light microscopes. The reason is that the wavelength of visible light is much larger than atoms themselves are. To be able to see a sample in a microscope, the wavelength has to be smaller than the sample itself. For example, light waves are smaller than cells which is why cells observed in light microscopes. Transmission electron microscopes use electrons instead of visible light. Thanks to the wave-particle duality, electrons can behave as both waves and particles. As waves, they have a much smaller wavelength than light which makes it possible to see atoms in a transmission electron microscope. Besides the use of electrons, the working principle of a TEM is the same as that of a light microscope.

Scanning tunneling microscopy (STM)

Scanning tunneling microscopy is another microscopic technique. It is based on a quantum mechanical phenomenon called ”tunneling”. Electrons can ”tunnel”, or in other words transtition, from an atom on the tip of an extremely sharp needle to atoms on a sample surface. Needle and surface have to be at a very short distance from each other to enable tunneling. The probability of tunneling increases when the gap between the needle and the surface gets smaller. This means that electron tunneling is more likely to occur when the needle tip is above the center of an atom as compared to the tip being above the space between two atoms. In consequence, a topographic picture of the atoms on the sample surface can be obtained.

Atom probe tomography (APT)

Atom probe tomography is a very powerful technique that can provide three-dimensional images of a sample’s atomic structure. In APT, the magnification is caused by a highly curved electric field instead of electron properties like wavelength or tunneling. For this technique, atoms have to be removed from the sample surface and turned into ions, in other words they have to be ionized. To obtain three-dimensional information, the atoms are removed from the sample layer by layer, which means that, unlike the previous two methods, this technique is destructive.

The Isolation and Detection of Starch – A Practical for Science Lessons

1 Goal

In this lab you will isolate starch from potatoes and investigate if different food samples contain starch. This is done with the help of Lugol’s solution (iodine/ potassium iodide solution).

2 Introduction

Starch is an organic compounds that belongs to the carbohydrates. Carbohydrates are an energy storage for both plants and animals. Starch molecules are very long and the building blocks repeat themselves. They form long chains and belong to the so-called poly saccharides. The two building blocks of starch are amylose which forms spiral chains and amylopectin which forms branched chains. Both are built up from glucose rests which is why the chemical formula can generally be written as (C6H10O5)n. Starch can be found, e.g. in root crops and grains.

The presence of starch can be detected with with the help of Lugol’s solution which is a mixture of iodine and potassium iodide dissolve din water. Potassium iodide is added to increase iodine’s solubility in water. Iodine molecules (I2) are stored in the spiral chains of amylose when Lugol’s solution (brown solution due to the iodine) is added to the starch. This storage compound (”iodine starch”) causes a blue-black colour. A schematic of the compound is shown to the right in the figure above.

3 Materials and Chemicals

  • Two Potatoes
  • Different other foods: Flour, bacon, cheese, apples, pasta and rice are recommended
  • Lugol’s solution (= iodine/potassium iodide solution)
    – Preparation: Dissolve 10 g potassium iodide in 100 ml of distilled water. Then slowly add 5 g iodine crystals, while shaking. Finally, lter and store in a tightly stoppered brown glass bottle.
  • Knife and Spoon
  • Several Test Tubes with Gummy Plugs
  • Mortar
  • One 250 ml-Beaker and one 800 ml- or 1000 ml-Beaker
  • Heating plate
  • Linen cloth
  • Funnel
  • Two Bowls
  • Grater

    4 Implementation

    4.1 The isolation of starch

    First, the potatoes need to be cleaned and peeled. Thereafter, they are grated and put into a bowl. 500 ml of water are added and the mixture is stirred thoroughly with a spoon for at least five minutes. A linen cloth is placed in a funnel and the mixture is pressed through into a large beaker (800 ml or 1000 ml). A part of the grated potatoes, for example the cellulose, will stay behind in the linen cloth. The liquid in the large beaker needs to stand and rest for approximately ve minutes. Then more water is added, approximately 100 – 200 ml. The finely dispersed, solid starch particles will slowly settle at the bottom of the beaker. Afterwards, the
    water is decanted (= poured off). Then 100-200 ml of water are added again to
    the large beaker and decanted when the solid starch particles have settled on the
    bottom a second time. This cleaning step is repeated until the starch particles have
    a completely white colour. Afterwards, the starch is dried in a at bowl in air and
    at room temperature.

    4.2 The detection of starch

    The foods are crushed in a mortar and and small amounts of each are put into their respective test tube. The test tubes are filled up to a third with water and shaken vigorously. In case not all the food particles are suspended, the test tubes are heated in a water bath (water bath = a 250 ml-beaker filled with water and the test tube inside is heated carefully on a heating plate, the test tube is afterwards cooled under owing, cold water). Then one drop of Lugol’s solution is added to each test tube and the test tubes are shaken with a gummy plug on top.

5 Questions for Discussion

1. What is observed macroscopically when iodine is built into starch molecules? What happens when no starch is present?

2. Which function does starch have?

3. In which foods do you expect to detect starch? In which foods should there be no starch?

4. Do the results in the table match your expectations? If not, why could they be different?

References

Image retrieved from: Petra Mischnick, Skolan för kemivetenskap , Kungliga Tekniska Högskolan, Stockholm, 11 January 2013 (https://www.kth.se/che/archive/arkiv/molnov-1.272910, 30 August 2017).

What happens during cooking, frying and baking?

cooking frying baking

Cooking and frying cause chemical changes in food and lead to the formation of new substances. One obvious change is that many foods like meat, eggs or potatoes turn brown when being fried. This is caused by a chemical process called the Maillard reaction. This reaction takes place between an amino acid and a reducing sugar. In the reaction, the carbonyl group of the sugar reacts with the amino group of the amino acid and forms a new substance with a brown colour and a better taste. There are many different sugars and amino acids in food which is why the number of different brown, well-tasting products is very large. The Maillard reaction requires the addition of heat and does not occur before 140 degrees Celsius. This reaction is responsible for the colour and taste of a great variety of foods. Besides the well-known colour of fried (or grilled) meat, eggs, potatoes and other vegetables, it is also resposible for the brown colour and taste of toasted bread as well as roasted coffee beans.

Another process which happens during both frying and cooking is the denaturation of proteins. Large protein molecules are normally folded in a very specific way. During denaturation they unfold. This process can be compared to unfolding a piece of Origami art until only a sheet of crumpled paper is left. These crumpled proteins can easily become entangled with each other in a process called coagulation. In addition, the cell walls of vegetables like potatos and carrots are broken down by high temperatures when being cooked or fried. This makes them easier to digest for us humans as compared to eating them raw.

Like for frying, the Maillard reaction plays an important role for baking too and causes the brown colour cakes take on when they are placed in an oven. Other browning reactions like the caramalization of sugars take place as well. Caramalization is the oxidation of sugars which turns them into brown products. It should be noted that caramalization happens at different temperatures for various sugars. Fructose, for example caramalizes at only 110 degrees Celsius, while 160 degrees are necessary to caramalize glucose. The denaturation and following coagulation of proteins is essential for baking too because it results in the stiffening of the dough.

Today, the chemical reactions caused by so-called raising agents are important as well. Baking powder and self-raising flour normally contain a substance called sodium bicarbonate (also known as baking soda) and a solid acid. When water and heat are added this mixture releases the gas carbon dioxide which gives cakes their fluffy textures. Evaporating water further contributes to this process which is called expansion.

Fluffy cakes as we know them today first entered the kitchen in the 18th and 19th century. Before that, cakes were generally flat and rather heavy, like fruited tea cakes for example. During the time of the first fluffy cakes sodium bicarbonate had not been discovered yet. Instead, yeast was often used as a raising agent and it is still used today in some countries to bake bread. Another method was to beat eggs before adding them to the dough until they contained enough air bubbles, a method that could take a long time and required strong arm muscles.

The reactions taking place during deep-frying resemble in parts the ones during cooking and frying. The Maillard reaction, the denaturation and following coagulation of proteins as well as the break-down of cell walls happen here too. But due to the higher temperatures even more reactions like oxidations and polymerizations can take place, even in the frying oil itself. Another problem is that while the frying oil extracts nutriants like vitamins and minerals, it also creeps into the food and adds high numbers of calories. For this reason, deep-fried food is normally less healthy than its regularly fried or cooked counter parts. This can easily be shown by the example of a large baked potato which normally contains about 220 calories and 1 g of fat. If the same potato is cut up and turned into chips (or French fries), it will contain almost 700 calories and 34 g of fat. In conclusion, deep-frying creates very well-tasting foods, but it is important not to consume them on a regular basis.

Scientific Methods in Archeology

Image credit: Pixabay, 2017.

There are few fields that are as interdisciplinary as archeology. From radiocarbon dating to ground-penetrating radar, Archeologists use a wide range of scientific methods to gain insights into historic cultures. But which scientific methods are actually most useful to archeologists? And what kind of information do they provide? I have interviewed Professor Kerstin Lidén, an archeologist at Stockholm University, to find out more about this. According to her the three most important scientific methods for archeology are ground-penetrating radar (GPR), mass spectrometry and X-ray fluorescence (XRF).

Ground penetrating radar (GPR) is a physical method also used in geosciences. It emits radio waves into the ground and detects their reflections caused by burried structures, for example ruins of castles, temples or settlements. GPR is popular because it offers the possibility to identify the location and the form of buildings and monuments without digging them up.

Mass spectrometry is a chemical technique that normally helps to determine the composition of unknown substances, as many of us have seen in TV crime dramas. In archeology, however, it is used differently. Here, its main task is to identify different isotopes (atoms of the same element with different neutron numbers). One example is the identification of the carbon-14 isotope, a radioactive carbon isotope used for radiocarbon dating. As long as plants, animals or humans live they incorporate carbon-14 into their systems, either by photosynthesis or by eating plants. No new carbon-14 enters the organism after death and conclusions can be drawn about age from the radioactive decay of carbon-14 and its half-life.

Isotope analysis can teach us even more about long-deceased organisms. Carbon and nitrogen isotopes are used to reconstruct diets, while oxygen isotopes can help to determine geographic origins and environment. Strontium and lead isotopes, on the other hand, can give clues about population mobility which means seasonal and/or permanent migrations.

X-ray fluorescence (XRF) is popular to gain information about the chemical and elemental composition of historic artefacts made from metal, glass or ceramics. This method works by bombarding the archeological sample with X-rays or gamma-rays which causes the removal of inner-shell electrons from the sample atoms. As a response, electrons from outer-shells will ”fall” into the inner-shells and simultaneously emit energy in the form of characteristic X-rays. These can be used to identify the chemical composition of the artefact.

Besides the three techniques described here, there are many other, some pretty cool, methods in operation by archeologists. Lidén gives the example of one colleague who used laser scanning to study the writing on rune stones. This analysis showed that different people had carved on the same rune stone. According to Lidén it is like analysing hand writing, only that it is over 1000 years old.

Lidén also says that the goal of archeologists is to get ”life history details of individuals that have been dead for thousands of years”. The information from different scientific techniques has to be put together like a puzzle to gain this information. In the end, archeologists will know what an individual ate at different points in life, where he/she lived and if there was movement between different geographical areas, which diseases the person might have had and when the individual died. This kind of information is important to understand variations and similarties between different cultures and populations.

What Lidén is most proud of in her own work was showing that two archeological cultures in Sweden were really two different cultures. She and her team were able to show that they did not only use different materials and burried their dead differently, but also actually ate different foods. This had long been disputed in Sweden before.


The chemistry behind arts

chemistry-and-arts

Before the industrial revolution in the 19th century, the range of colours available for paintings was rather limited. Only naturally occuring earth pigments, minerals and some materials of biologic origin, for example insects, could be used.

While earth pigments like ochre and other iron oxides have been since the stone age, other colours were much more difficult to obtain. They had to be traded over long distances during the middle ages and the renaissance. Some colours like blue and purple were especially expensive and became associated with royalty. In the 18th century, the first cheaper, synthetic colours, for example Prussian blue and Scheele’s green, were invented which made them more accessible to artists.

These colours normally came in powder form and when an artist got a hold of the pigments he needed they still had to be mixed with a liquid. For oil paintings, the powders were normally mixed with linseed oil forming a paste which had to be used right away. Other painting techniques preferred other liquids, for example water was mixed with colour pigments to create watercolor paintings called ”aquarelle” in French. This technique is still very common in school art lessons today.

Let us go through different colours and look at how they have been produced throughout history. You can even find the information in the infographic above.

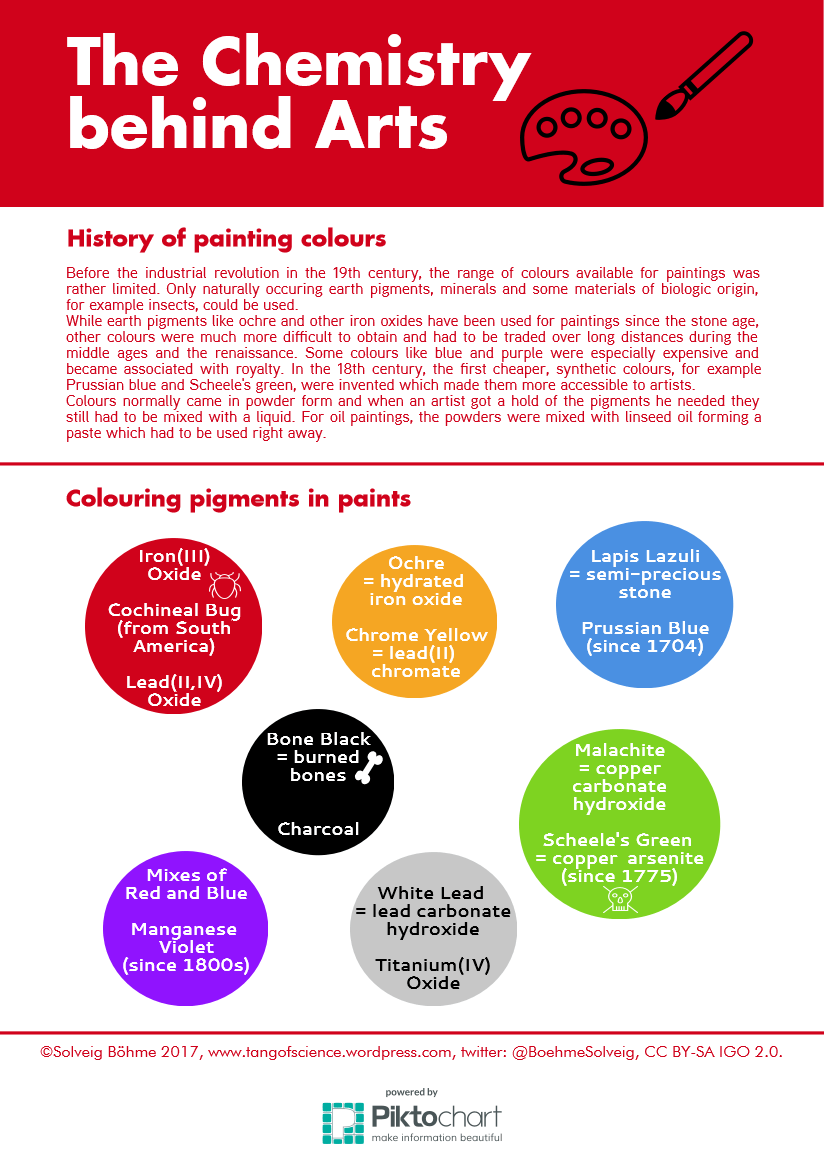
Red – This colour can be created with iron(III) oxide which has been used since the cave paintings of the stone age. During the Roman Empire and the middle ages, another red pigment called ”minium” with the chemical name lead(II,IV) oxide became popular, especially to colour manuscripts. Lead-containing substances like minium are poisonous and small amounts are accumulated in the body during permanet exposure. This shows that not all the colours used by artists throughout history were safe and we will encounter even more toxic pigments further on. Fortunately, a non-toxic red pigment came into use during the 16th century. It consisted of the dried, pulverized bodies of female cochineal bugs from Southern America. This pigment is still used today, for example in lipstick colours.

Yellow – Also yellow pigments have been around since the stone age. They were produced from ochre, which has the chemical name hydrated iron oxide. In 1797, the synthetic pigment chrome yellow, also called lead(II) chromate, was invented by mixing solutions of lead nitrate and potassium chromate. It became popular among artists during the first half of the 19th century. Due to the contained lead and chromium this pigment was poisonous as well.

Blue – Before the 18th century the main source of blue pigments was a semi-precious stone called ”lapis lazuli” which could only be found in one mountain range in Afghanistan. This is the main reason for its high price and the difficulty to obtain blue colours. The situation changed in 1704 when Prussian blue was invented as a cheaper, synthestic pigment. Prussian blue refers to range of compounds that are made up from iron, carbon and nitrogen. Carbon and nitrogen are joint together as cyanide ions that form so-called coordination complexes with iron in the center. Despite the presence of cyanide ions, these pigments are non-toxic and still in use today.

Green – Originally, the mineral malachite with the chemical name copper carbonate hydroxide has been employed as green pigments. In 1775, the Swedish chemist Carl Wilhelm Scheele invented a substance called copper arsenite which became a popular pigment under the name Scheele’s green. You might have guessed it from the chemical name, this compound contained arsenic which made it very toxic. Among all the poisonous colouring agents that have been used throughout history, this was probably the most lethal one. Especially its use in wall paper and clothing has been linked to many deaths during the 19th century in Britain and Europe.

Violet – Traditionally, mixtures of red and blue were used to create violet. The difficulty in obtaining blue colours made violet very expensive as well. During the 19th century, the first synthetic, cheaper pigment called manganese violet became available. Its chemical name is ammonium manganese(III) pyrophosphate and it is still used in cosmetics such as makeup and hair colouring.

White – For a long time, a compound called lead carbonate hydroxide or white lead was used to produce white colours for paintings. But just like lead(II,IV) oxide (minium), its use is banned today due to the toxicity caused by the contained lead. The white pigment most commonly employed now in paints is titanium(IV) oxide.

Black – Just like red and yellow, black pigments have been around since the stone age and quite easy to make. The earliest black pigment was probably charcoal produced by burning wood or other vegetation. A popular method to create black pigments during the 17th and 18th century was burning animal bones in air-free chambers which resulted in pigments referred to as ”bone black”.

The chemistry of soaps and why it matters

Soap is made via a chemical reaction between a fat and sodium hydroxide (NaOH). The reaction is called saponification and produces salts which consist of sodium ions and fatty-acid ions. The latter have one long chain of carbon atoms each. These sodium-ion fatty-acid salts are very good at removing dirt and we also call them soaps. Their secret is that the non-polar, long carbon chains of the fatty acids are aranged in spheres around the non-polar dirt particles. The opposite chain ends, where the polar sodium ions are attached, face the polar water. These arrangements are called micelles and they can dissolve dirt from your clothes or skin.

Making soap in this way is actually quite environmentally friendly. Sodium hydroxide is normally used in the form of lye which is made by leaching wood ashes with water. Historically, the fat has often come from animals, but today fats from plants, such as olive oil or grapeseed oil, are used since they create nicer soaps. In summary, soap can today easily be produced using only renewable sources from plants.

Sounds like soap making is an eco-friendly process? Yes, but unfortunately reality looks very different. When I researched this topic, I was really shocked when I found out which substances are actually being put into these products, despite better knowledge.

Let us start by talking about the actual cleaning agents, the substances that remove the dirt. Traditionally, soaps as described above have been used for this task and I believed that this was still the case. But it turns out that today most cleaning agents are made from petroleum instead of vegetable oils. These petroleum-based chemicals work the same way as real soap does by forming micelles around dirt particles to dissolve them. They are, for example, found in laundry detergent and liquid body wash. Only bar soaps still contain the more environmentally benign, real soaps. But be careful, not all of them do. You should check if it actually says ”soap” on the packaging to be sure.

There are even more reasons why solid soap products are more environmentally friendly. On average the production of bar soap consumes five times less energy than liquid soap. Another important factor is water. Liquid soaps as well as liquid laundry detergents contain 80 % more water than their solid counterparts. In addition, liquid products come in non-reusable plastic bottles, while the solid products come in cardboard packaging.

Besides the petroleum-based cleaning agents, manufacturers often add a range of other questionable chemicals to liquid soaps. One famous example are parabens which are added to about 85 % of all liquid cosmetic products to prevent bacteria and fungus growth. Parabens can be mistaken for estrogen by the body which has been linked to both breast cancer and reproductive issues. It will be interesting to see if they could be related to the recently reported drop in sperm count among Western men. Also, paraben substitutes like phenoxy ethanol should be used with caution. Bar soaps and other solid cosmetic products, on the other hand, do not need any preservatives and are a healthier choice.

Some harmful chemicals could also be hiding under the label ”fragrance” or ”parfume”. Their compositions do not have to be revealed as they are considered trade secrets which leaves the consumer clueless about what they are made of. At least one villain chemical, called phthalates which has been linked to many health issues, is often included in parfumes as a preservative.

So, the bottom line is: use bar soaps, make sure that it contains real soap and check that all contents are revealed. As for laundry detergent, washing powder is better than liquid detergent. You can also easily make your own laundry detergent and bar soaps at home.


How does breathing change wine?

It is this time of year where you can sit outside in the evenings to hang out with friends. Throughout this time many bottles of wine are shared and enjoyed. During such an evening with several bottles of red wine, me and some friends noticed that the taste of one particular red wine became better the later the evening got. This was not because we were getting more and more drunk, but rather due to a process called ”breathing” or ”aeration”.

Breathing refers to chemical reactions taking place between the wine and the oxygen in air that start once the bottle is opened. Generally, two processes occur during breathing, these are evaporation and oxidation which cause the wine to release new aromas and flavors.

Evaporation is the transition from the liquid to the gas phase and some volatile compounds easily evaporate in contact with air. Examples are sulphur containing substances formed by sulphites in the wine. Sulphites are added to wine to protect it from bacteria. The second process, oxidation, is in this case the reaction of wine compounds with the oxygen in air, a similar process to the rusting of iron  (where iron reacts with the oxygen in air). Substances in wine sensitive to oxidation are various poly-aromatic compounds like catechins and anthocyanins. They are the flavor-rich, dark pigment molecules that give red whine its color.

It is worth mentioning that the production of flavor-rich, dark pigment molecules like anthocyanins and other poly-aromatic compounds in grapes stops at temperatures that remain constantly around 30 degrees Celsuis. This leads to a decrease of flavor-rich compounds and is one of many reasons why climate change is threatening to ruin the global wine production.

Additionally, ethanol, in other words alcohol, is sensitive to oxidation as well if a wine bottle is opened too long, for example over several days. During the oxidation of alcohol acetaldehyde and acetic acid are formed. Acetic acid is the main compound in vinegar and the reason wine turns sour after having been opened too long.

The last example shows that unlimited breathing is not good for wine either. In addition, not all wines benefit from breathing. Especially, older wines can deteriorate very quickly when in contact with air. Young, red wines, on the other hand, like the one my friends and me had, benefit a lot from breathing. White wines normally lack the dark pigment molecules that change during oxidation. For this reason breathing does mostly not alter the taste or white wines.

So, how long do you need to let a red wine breathe? Generally, you should taste a wine before deciding if it needs breathing at all. As bottle necks are quite narrow, they do not provide a lot of contact with air and the wine will need at least 30 to 60 minutes to breathe on its own. However, there are ways to speed up the process. For example, you could pour the wine into a decanter, a vessel with a neck for pouring and a very broad bottle body to provide a large surface area for the wine to breathe. You could also pour the wine back and forth between two vessels or just swirl your glass before drinking the wine.

I hope the weather is nice were you are, so you can enjoy a glass outside with friends tonight.

New magnets for wind power plants

Image credit: Johan Cedervall, 2017. CC BY-SA IGO 3.0. This material is a strong magnet investigated for the use in wind power plants and other applications.

Almost everyone has seen magnets in action when sticking a birthday card or the drawing of a child to a refrigerator. Some might have even used one when taking a compass on a hike. There is one more important application for magnets that most of us have seen: wind power plants. The generators inside wind power plants use very strong magnets to create electricity. These magnets are normally made from the elements neodymium, iron and boron.

While iron and boron are are relatively easy to extract and separate from their minerals (or stones), neodymium is a rare-earth element. There are in total 17 rare-earth elements and despite their name, they are actually quite plentiful in the Earth`s crust. The problem is that these elements tend to occur together in the same minerals which makes their extraction and separation extremely difficult and expensive. In addition, China stands for 85 % of all rare-earth element production which provides a monopoly position enabling it to dictate prices and make other countries dependent. Besides, there are strong environmental as well as health and safety concerns about the mining procedures used in China.

For these reasons research is carried out to find new neodymium-free or rare-earth-free, strong magnets. I have spoken to Johan Cedervall, a PhD student in the Inorganic Chemistry group at Uppsala University, who is trying to make new rare-earth-free magnets for wind power plants and other applications. Cedervall is working on magnetic materials composed of iron, boron, phosphorus and silicon, all abundant materials which are relatively easy to extract from their minerals.

To produce his magnets, Cedervall melts the elements together in an electric arc (basically a permanent, artificial lightning) at 1500 to 2000 °C (2732 to 3632 °F) under argon atmosphere. This procedure results in a highly magnetic, grey compound as seen in the image above. According to Cedervall, his materials are generally a bit less magnetic and easier to demagnetize than conventional neodymium-based magnets, which is a disadvantage. But they are also much cheaper thanks to the absence of neodymium.

Nevertheless, Cedervall says, that the goal is to find even stronger rare-earth-free magnets than his for the use in wind power plants. The problem is that weaker magntic materials have to be used in larger amounts to reach the effect of a neodymium-based compound. For this reason, the search for strong, rare-earth-free magnets is ongoing.

Cedervall believes, that we will see a shift to rare-earth-free or rare-earth-lean (containing smaller amounts of neodymium) magnets in the near future. Wind power plants are being built at a rapid pace all over the world at the moment. To maintain this development, industry will sooner or later be forced to turn to alternative magnets. The German company Enercon has, in fact, already implemented neodymium-free technology into their wind turbines. In addition, magnetic materials called ferrites, for example strontium iron oxide, have already started to replace neodymium in other applications.

When asked which results of his research he is most proud off, Cedervall answers, that these are actually not related to wind power plants. All magnets lose their magnetic properties at a certain temperature when they are heated. This point is called Curie temperature which is between 500 and 600 °C (932 and 1112 °F) for Cedervall`s materials. He has found that this point can be tuned by the gradual substitution of iron with cobalt. A higher cobalt content decreases the Curie temperature, while a lower one increases it. This result could be interesting for building magnetic refrigerators that are safer and more environmentally friendly. The details of this application are a story for another time.