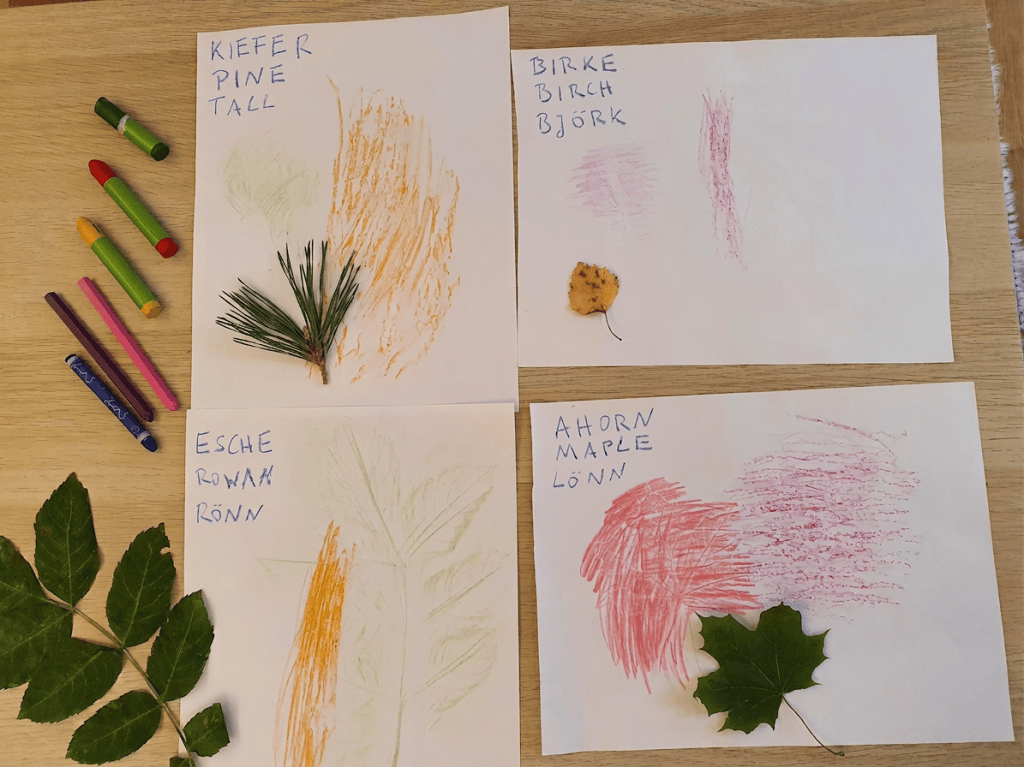
Tree Bark and Leaf Tracing

Collecting and pressing leaves from different trees is a popular autumn activity. It is a great way to help children learn about different types of trees. This activity takes the idea one step further by encouraging children to explore and compare the bark of different trees too.

Here is what you need:

  1. Wax crayons
  2. White paper
  3. Tape
  4. A few different types of trees to investigate in a nearby forest or park

What to do:

  1. Find an area with between three and six different types of trees to explore.
  2. Choose one tree to investigate first.
  3. Look closely at the tree’s bark. Is it smooth or rough? Does it have lots of cracks? Older children can write down what they notice.
  4. Hold a piece of paper firmly against the tree trunk with one hand. Use a wax crayon to colour over the paper and make a rubbing of the bark. Leave enough empty space on the paper to make a rubbing of a leaf later. It may be easier to work in pairs. One child can hold the paper against the tree while the other makes the rubbing.
  5. Write the name of the tree on your bark rubbing.
  6. Find a leaf from the same tree. Look carefully at it. What shape is it? What colour is it? Older children can write down what they notice.
  7. Keep the leaf safely with its bark rubbing so that you do not mix it up with leaves from other trees.
  8. Move on to the next tree. Make sure it is a different type of tree from the one you have just investigated. (My preschooler and I explored four different types of trees before they lost interest, but older children may enjoy investigating more.)
  9. Take your bark rubbings and collected leaves home with you.
  10. Once you are back inside, take out your bark rubbings and leaves.
  11. For each tree, place the leaf underneath the empty space you left on the paper.
  12. Use a wax crayon to make a rubbing of the leaf next to the bark rubbing.
  13. If you still have some empty space on the paper, you can use tape to attach the real leaf as well.
  14. Older children can compare the different types of trees they have investigated. They could share their notes and use them to complete a comparison table.

What can children learn?

I also used this activity to talk to my preschooler about the job that tree bark does. Bark protects a tree, a little like our skin protects our bodies.

We also talked about how different the bark of each type of tree can look. For example, the rowan tree had very smooth bark that almost looked like our skin. The pine tree, on the other hand, had much rougher bark with deep cracks.

My preschooler had already learned a lot about the different shapes of leaves, so I used this activity as a chance to focus more on bark. However, you can easily use the activity to explore both leaves and bark. It is a wonderful way to encourage children to look closely at the trees around them and discover how different each one can be.

Table to fill in for older children

Tree nameBark observationsLeaf observations

How to Make an Air Pressure Bottle Rocket

You will need:

  • 1 Empty plastic bottle (We found that smaller bottles like 500 ml work better than bigger ones.)
  • 1 Cork that fits tightly in the bottle
  • 1 Ball pump with a needle
  • Paper or cardboard for nose cone and fins
  • Scissors
  • Universal glue or tape for the fins and nose cone
  • Tiny screwdriver or similar tool to make a hole in the cork for the ball pump
  • Stickers or acrylic paint and paint brushes for decorating

Step 1: Build the Rocket

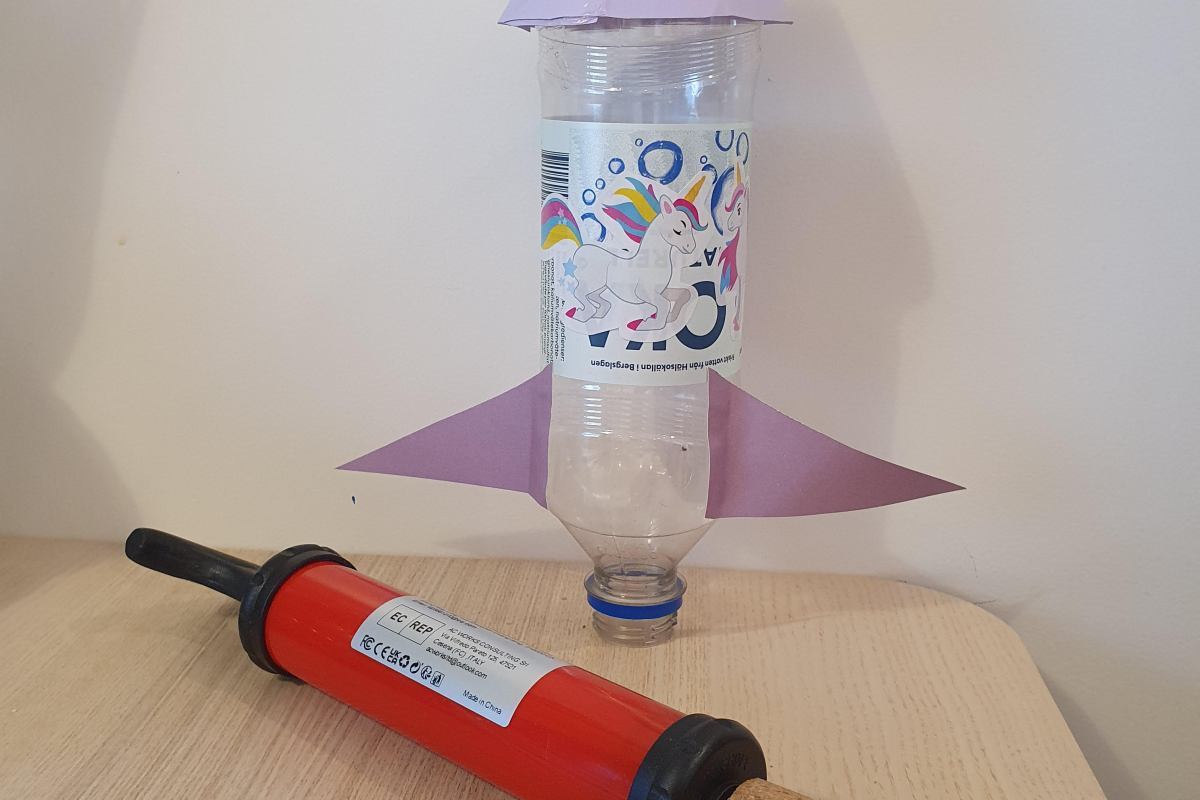
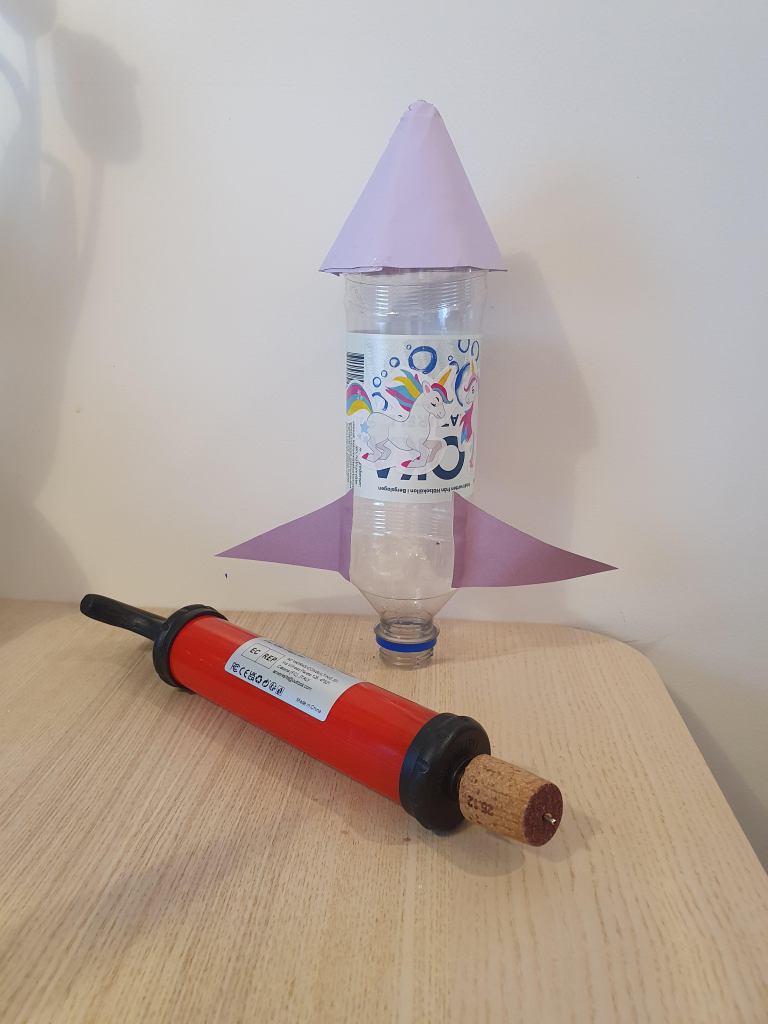
Turn the bottle upside down.
The bottle neck will be the bottom of the rocket.

Decorate the bottle with stickers or paint it with acrylic paint. If you use paint, wait for it to dry.

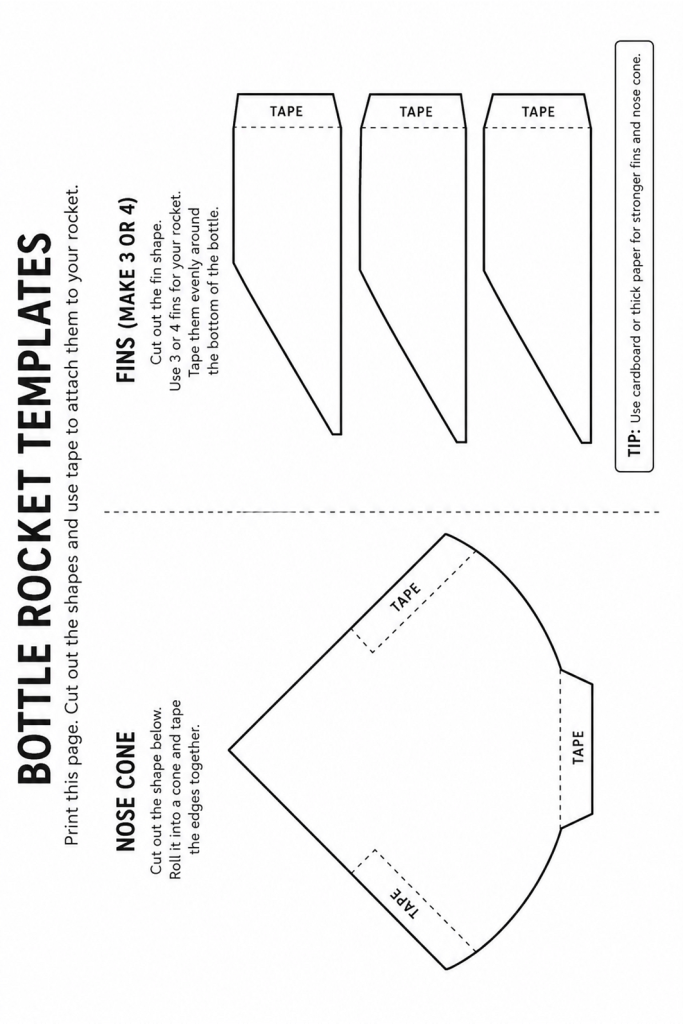
Cut the nose cone and fins from paper or cardboard. (We found that cardboard gives a more stable cone and fins.)

Glue or tape paper fins and a paper nose cone onto the bottle. Ask an adult for help if using universal glue.

Step 2: Put in the Cork

Select a cork that will fit tightly into the hole of the bottle.

Ask an adult to drill a small hole through the middle of the cork with a tiny screwdriver or a similar tool to fit the needle of the ball pump.

Push the cork tightly into the bottle opening. You can wrap it in tape to fit better if it is too small.

Step 3: Pump Air Into the Bottle

Take the rocket outside.

Place the needle of the ball pump through the hole prepared for it. It should fit quite tightly.

Point the bottle away from you and hold ONLY onto the ball pump or the cork outside the bottle. (Do NOT hold onto the bottle itself!)

Start pumping with the ball pump. You may need an adult to help with this (because it can require a lot of strength to pump the bottle completely full of air).

Step 4: Blast Off!

As more air goes inside, the pressure gets stronger.

Finally, the cork pops out and the rocket shoots away!

Why Does It Fly?

The pump pushes air into the bottle.
The air pressure builds up inside.
When the cork pops out, the fast-moving air pushes the rocket away.

The fast-moving air is an action which causes a reaction which is the rocket moving away.

This concept of action and reaction is also called Newton’s 3rd Law of Motion. This effect is also used by real rockets when they push of the ground. The main difference is that real space rockets use very strong fuels (hydrogen and oxygen) to create even more pressure and fast-moving gasses for the action part.

Safety Tips

  • Always launch outside.
  • Never point the rocket at yourself, other people or animals.
  • Always bring an adult to assist in your launch.
  • Ask an adult to help with universal glue and to make the tiny hole into the cork.

Template for fins and nose cone

Wildlife Feeding Traces: What to Look For

When taking a walk in the forest in early spring you can find many feeding traces of different animals. Join us in exploring some of them.

1 Traces left on trees

Deer, rabbits and hares all feast on the bark of trees during the winter months when grass and other plants do not grow well. But they leave different clues on trees that help us tell them apart.

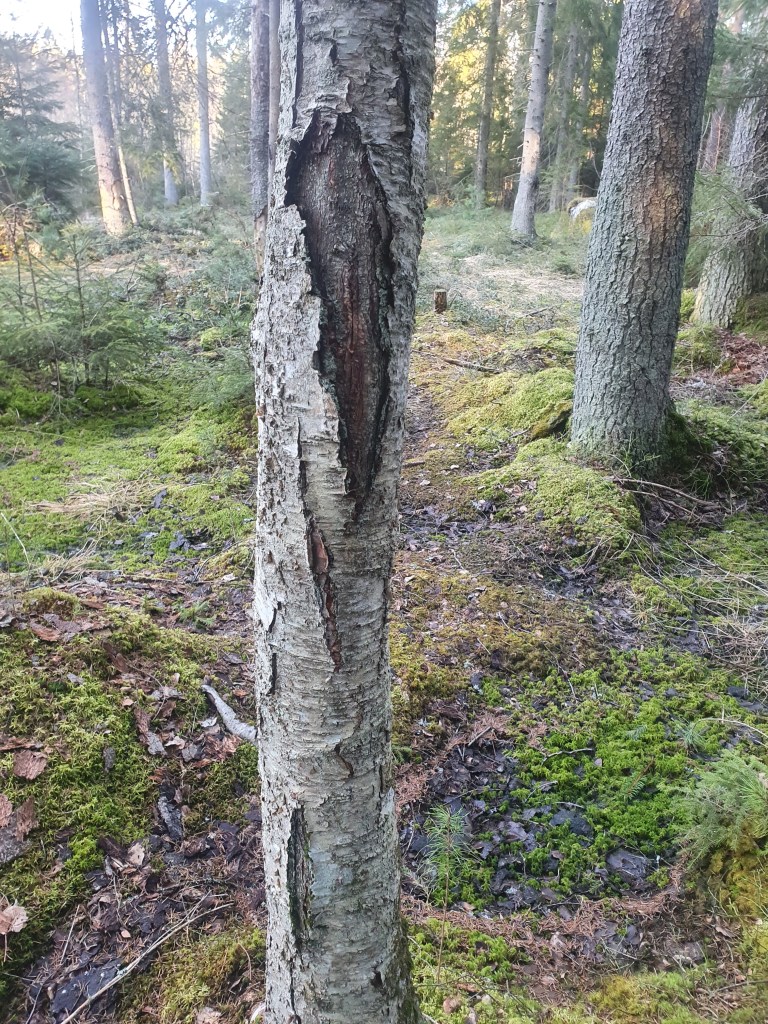
Deer are quite tall, so they can reach higher parts of a tree. When deer eat, they often tear the bark with their mouths. This can leave rough, jagged edges on the tree. You might also see damage higher up, about as tall as your chest or even above your head. In addition, roe deer and red deer normally pull of strips of bark, while fallow deer are more content to nibble.

The image below shows a tree which had some of its bark most likely stripped of by a roe deer during winter. The dark colour shows that the tree has begun to heal in this part.

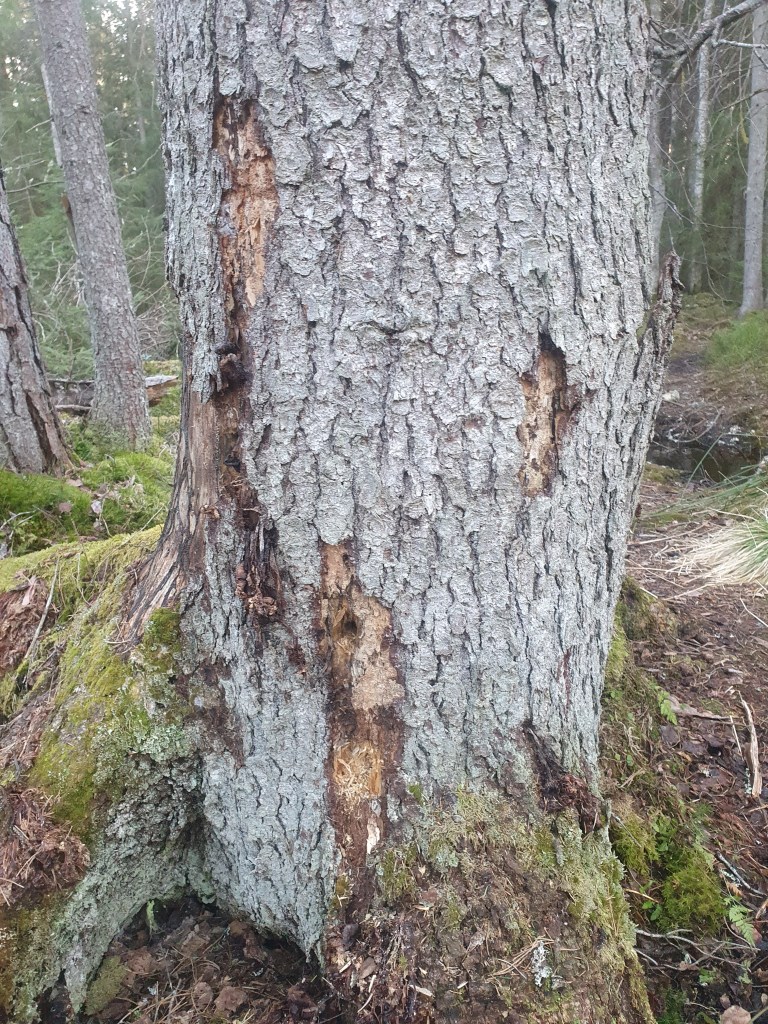
Rabbits and hares are much smaller than deer, so they can only reach low parts of a tree. They have very sharp front teeth, and they nibble neatly. This means the bark or twigs they eat often look cleanly cut, almost like they were snipped with tiny scissors. The damage is usually close to the ground.

This image shows the damage in the bark close to the ground which means that it may have been eaten by a rabbit or hare.

In summary, if the tree is damaged high up with rough edges, it was likely a deer. If the damage is low down with neat, tidy bites, it was probably a rabbit or a hare.

2 Traces left by wild boar

Wild boar leave very noticeable signs when they search for food in the forest.

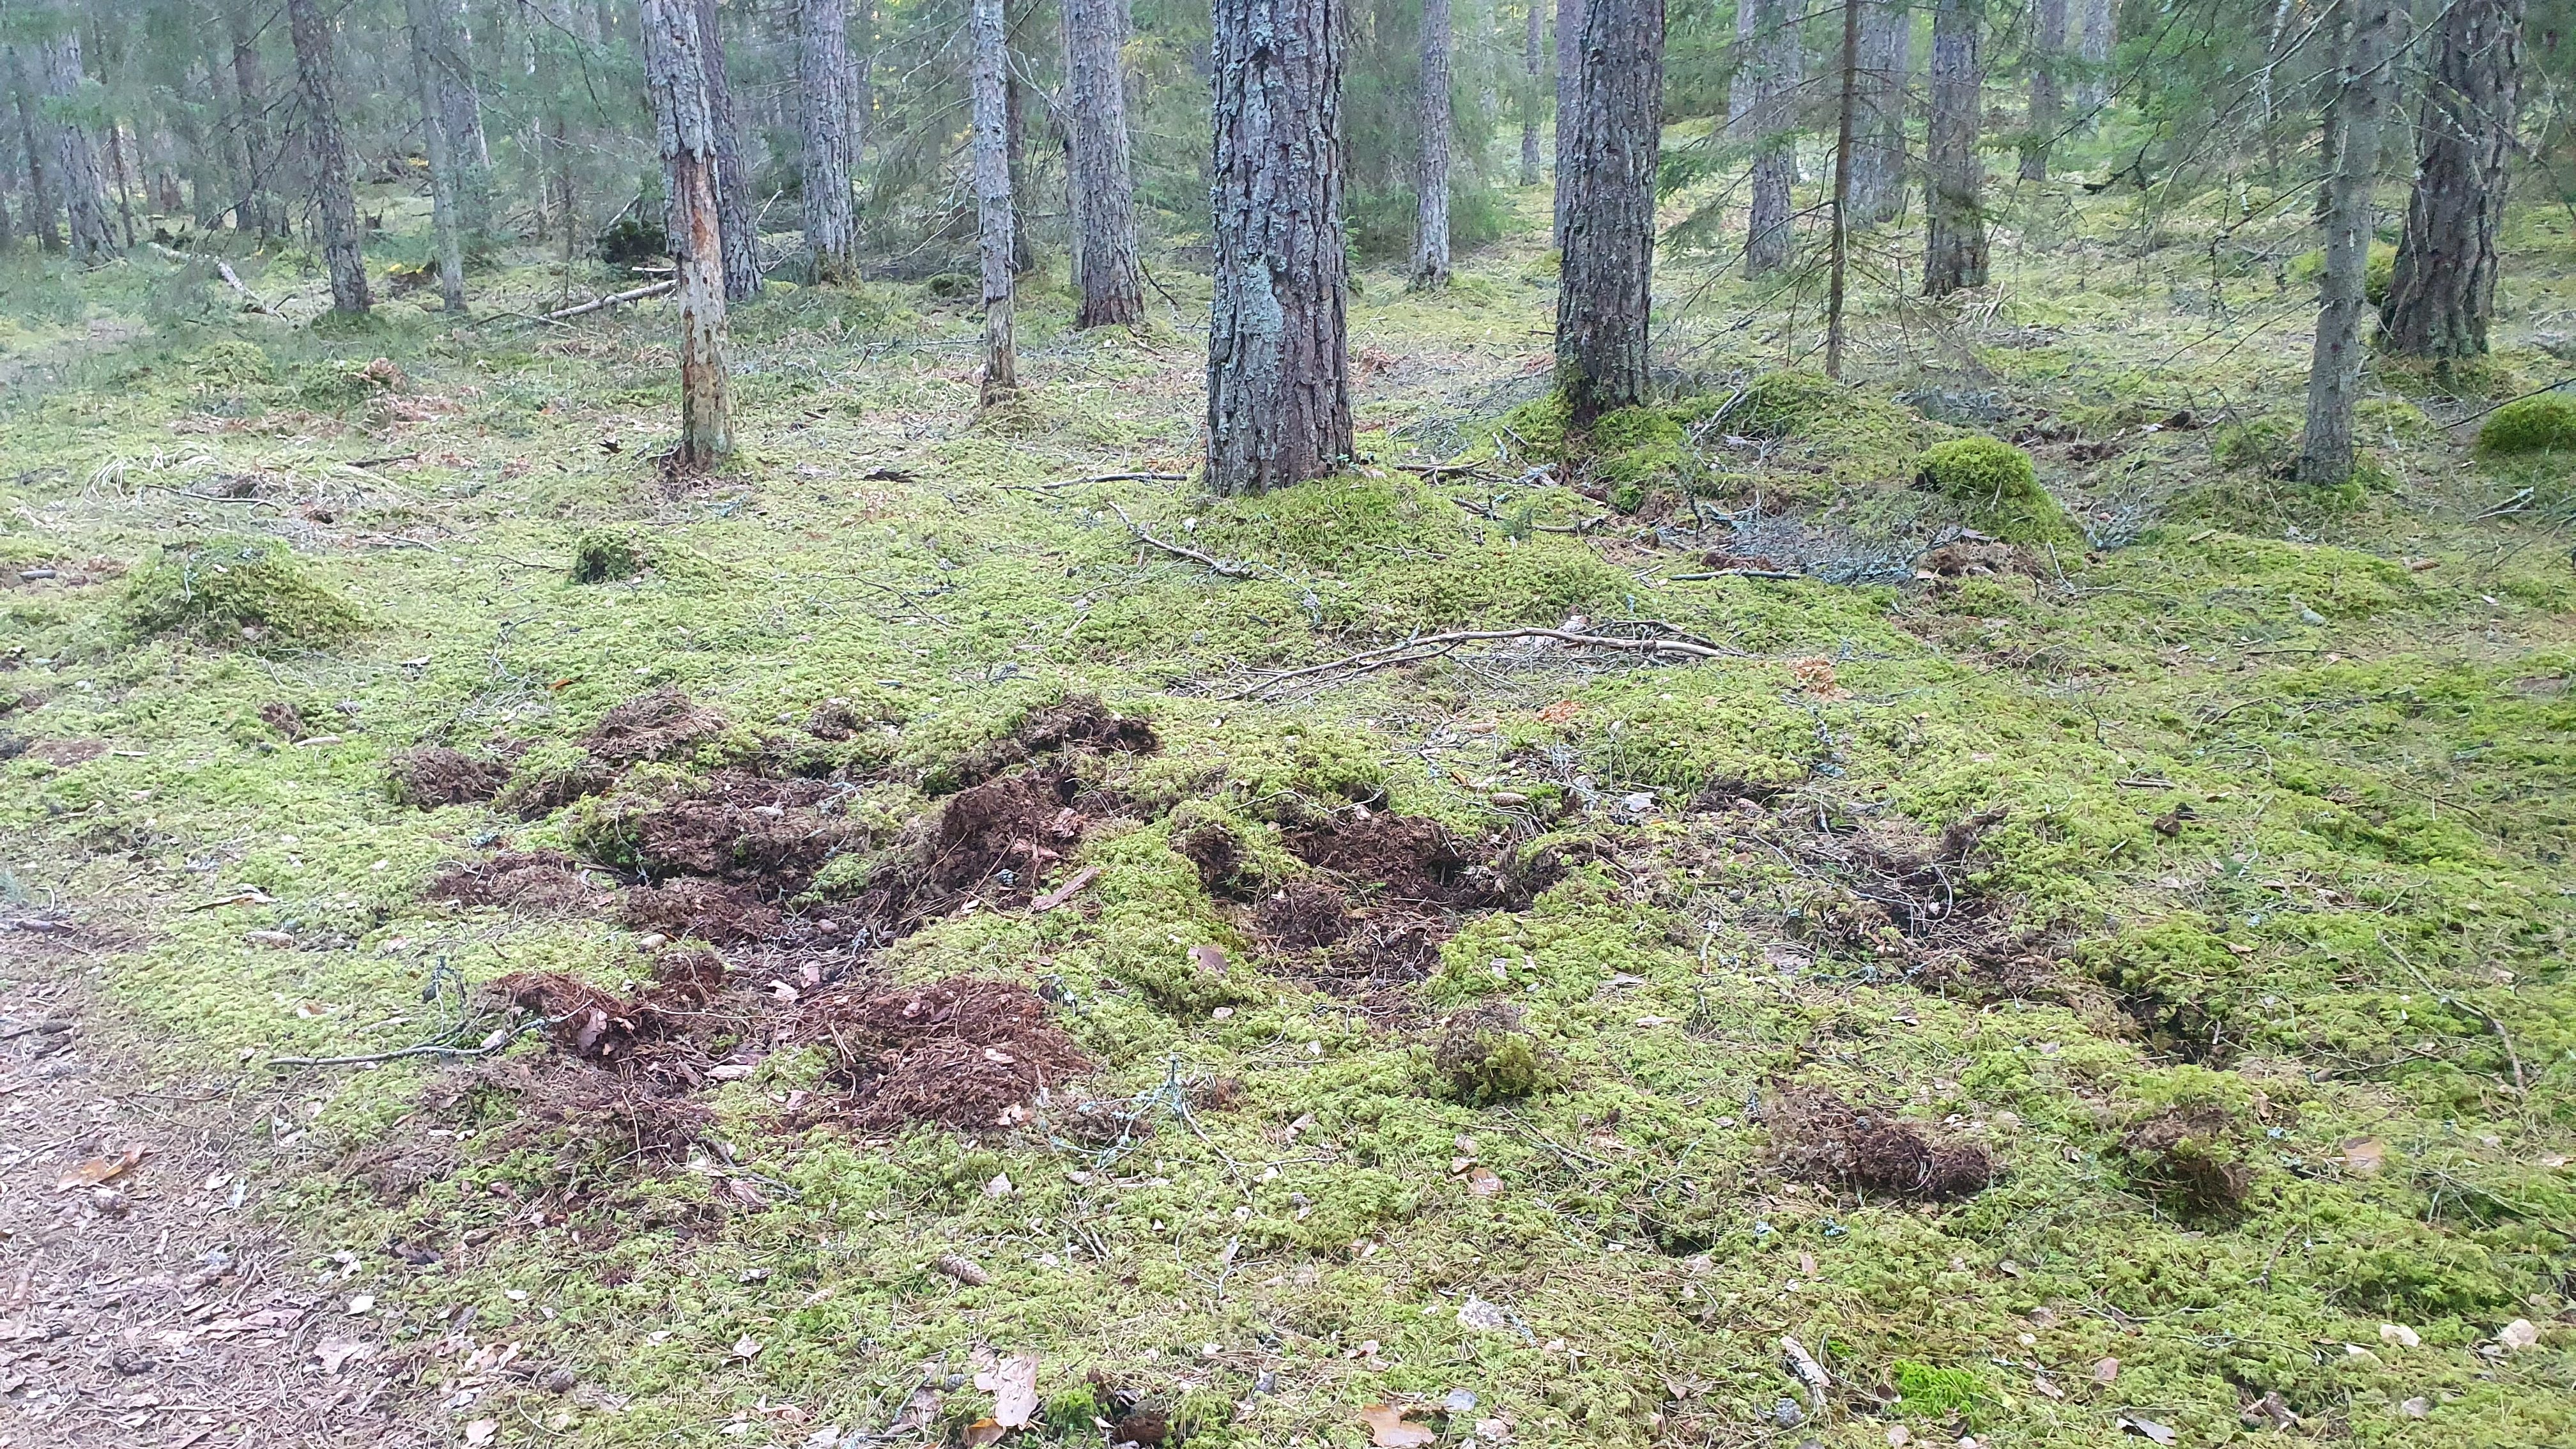
They use their strong snouts to dig in the ground. This is called “rooting.” When they do this, they turn over the soil looking for roots, insects, worms, and bulbs. The ground can look messy, with patches of earth all churned up, almost like it has been ploughed.

You might also see small holes and uneven ground where they have been digging. Sometimes large areas are disturbed, not just one spot.

Wild boar can also leave footprints. Their tracks look a bit like a deer’s, but they are rounder and wider. If the ground is soft, you may see many of these prints together.

So, if you see torn-up soil, lots of digging marks, and hoof prints in the forest, a wild boar has probably been there looking for food.

The image below shows a small area in a forest where wild boar have rooted for food.

3 Traces left on gnawed cones

In the forest, you can often find eaten spruce cones on the ground. By looking closely, you can tell which animal has been feeding on them.

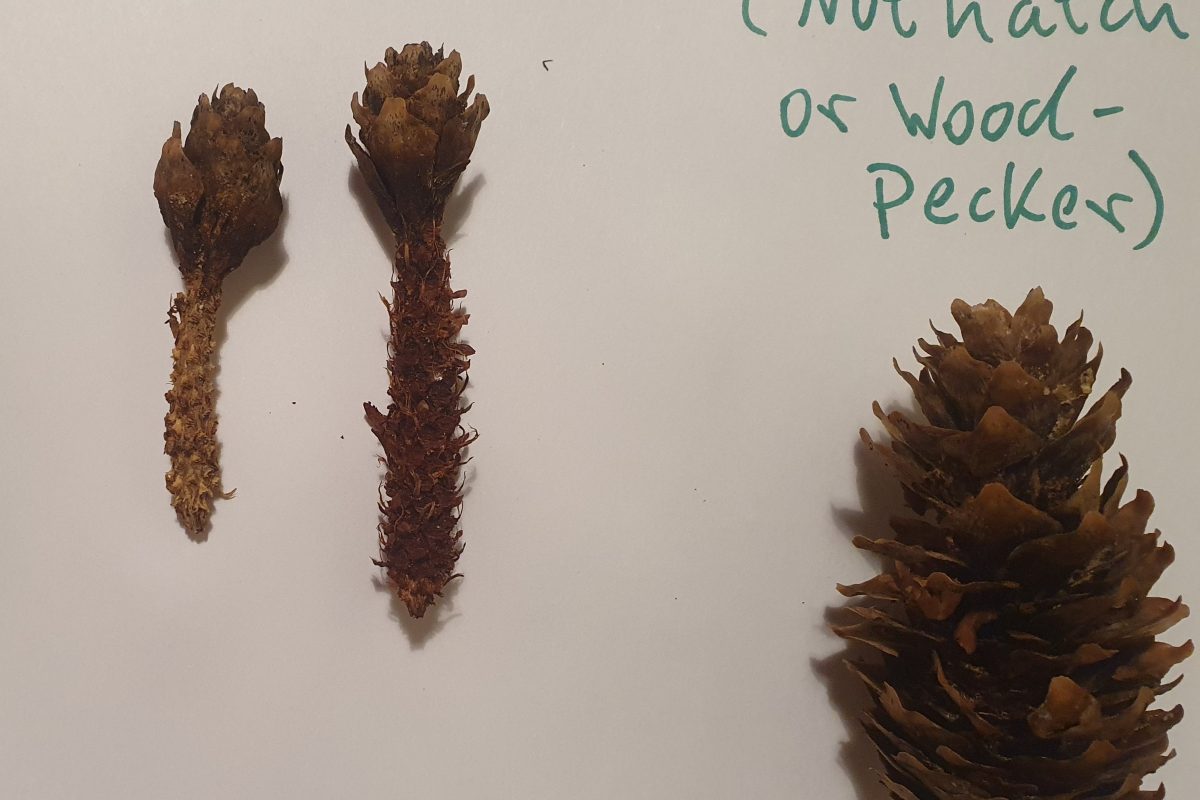
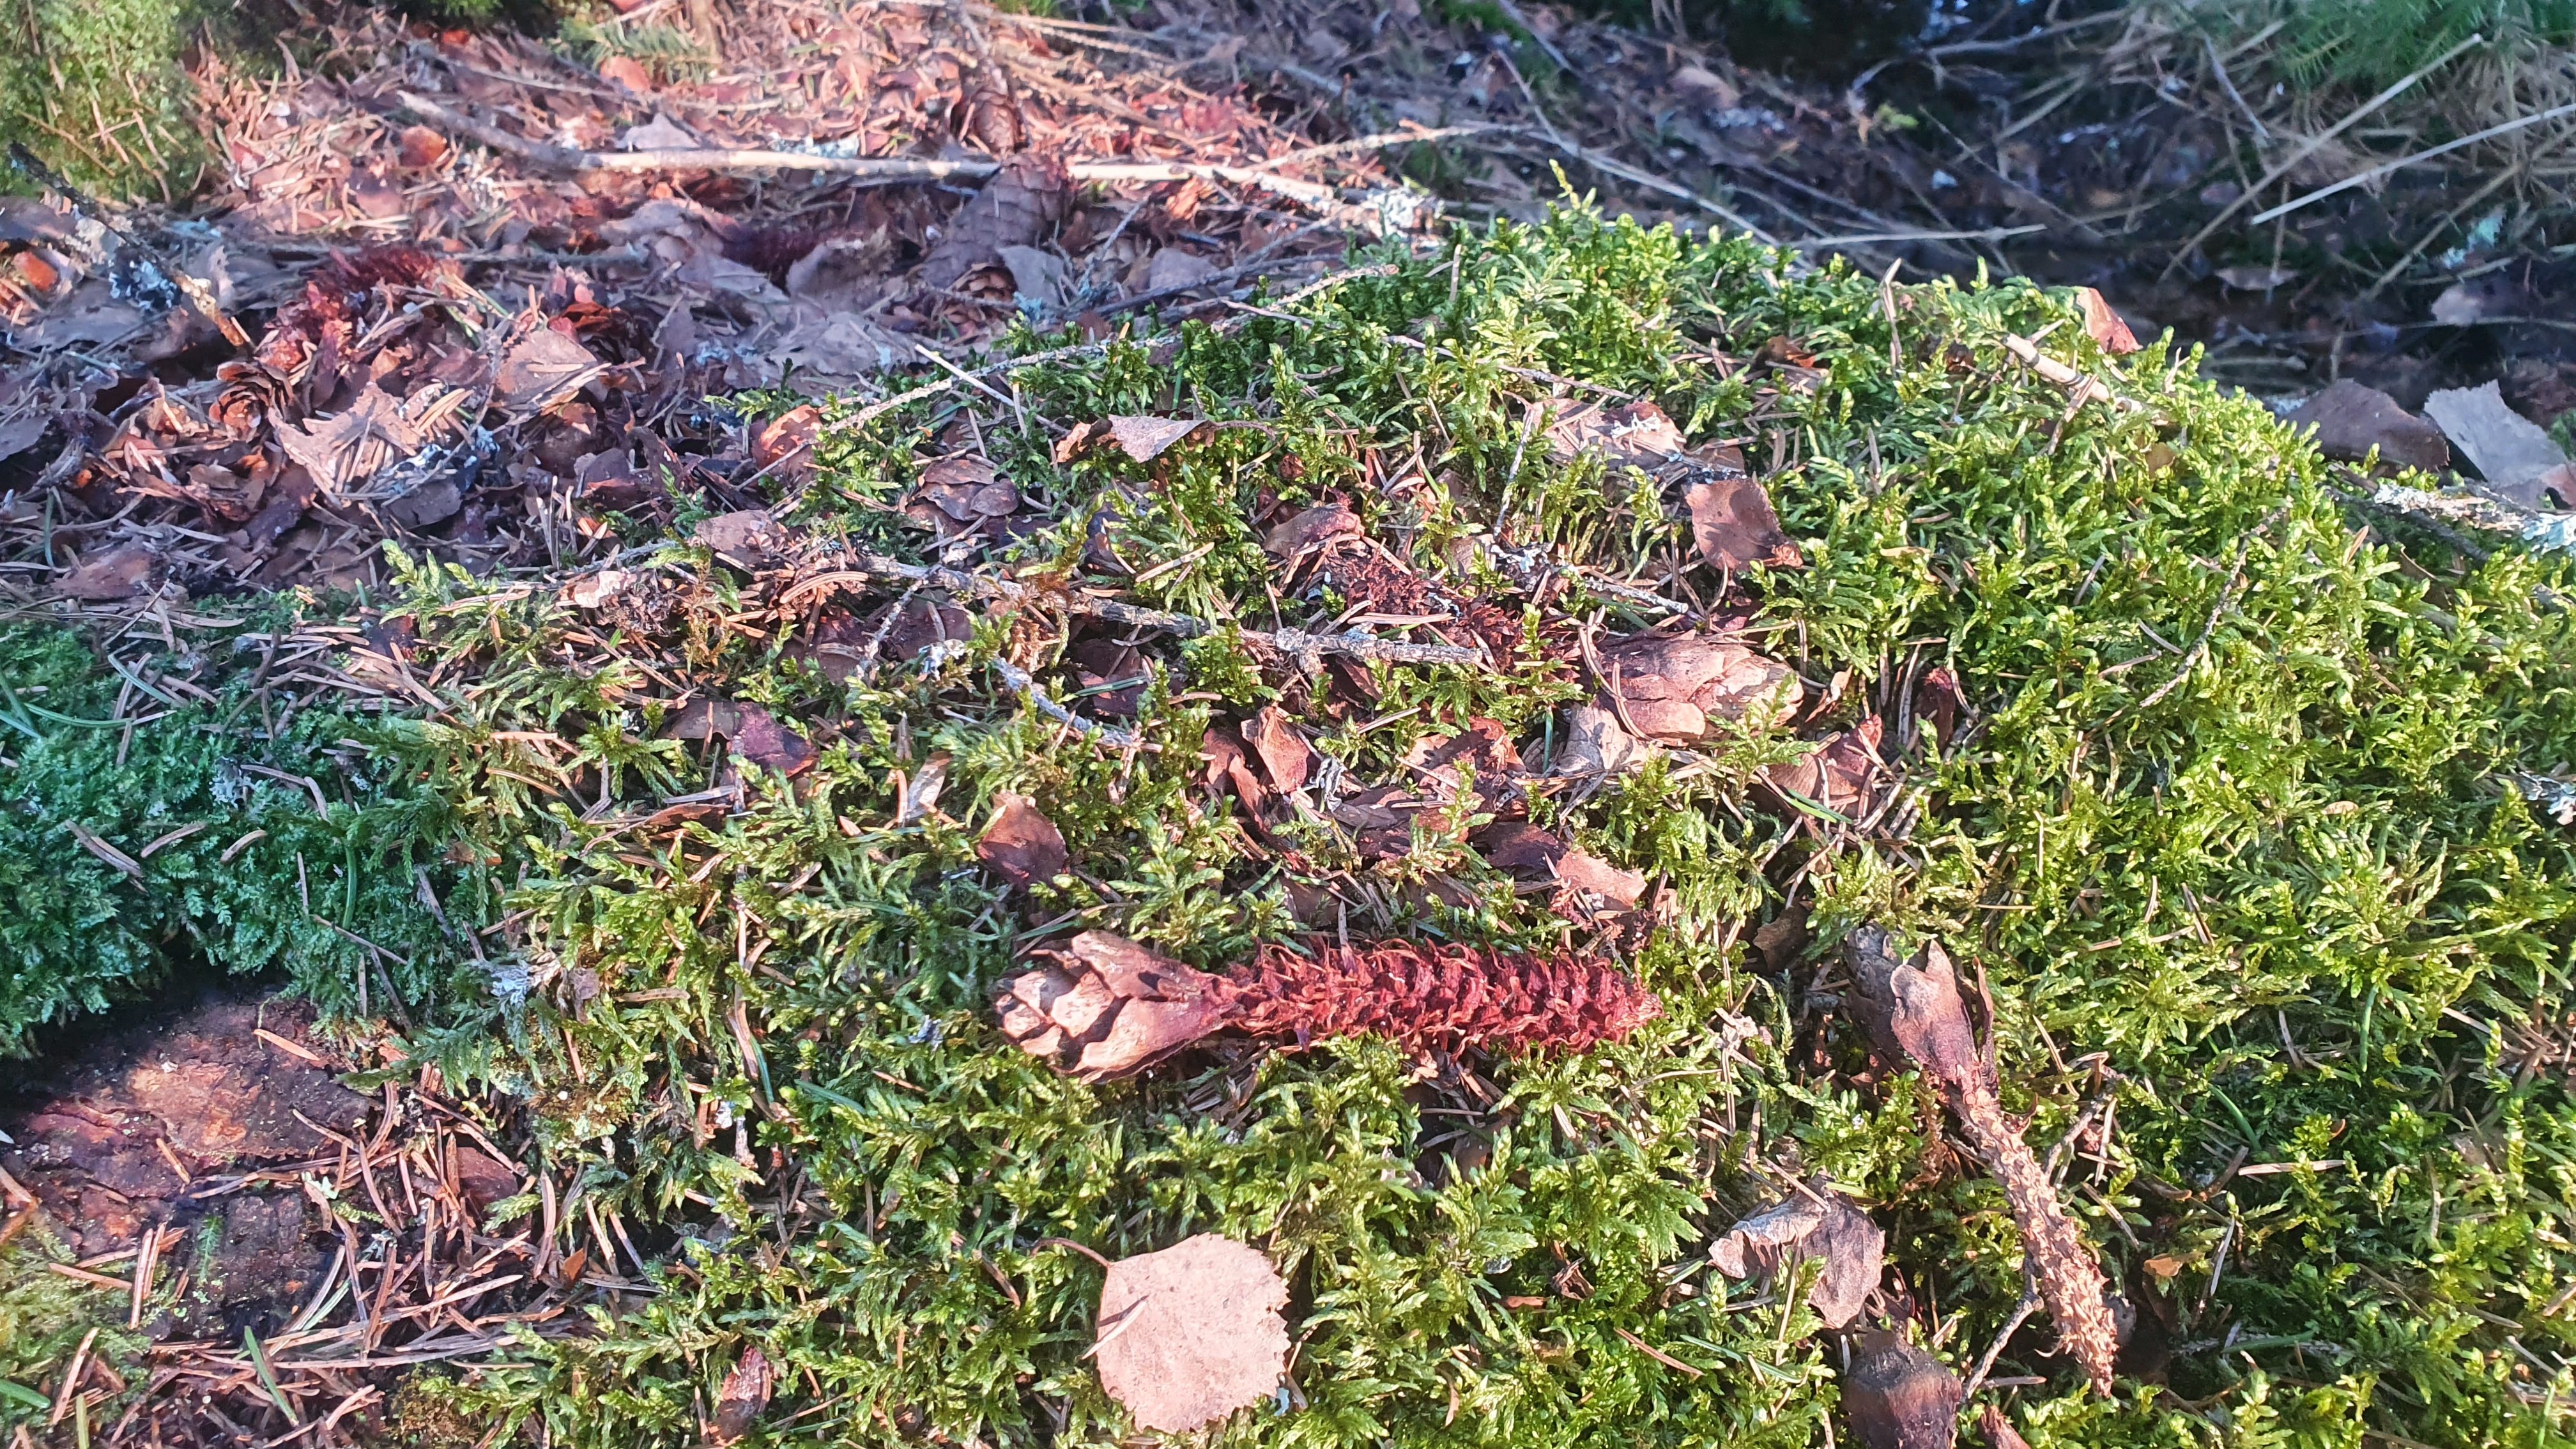
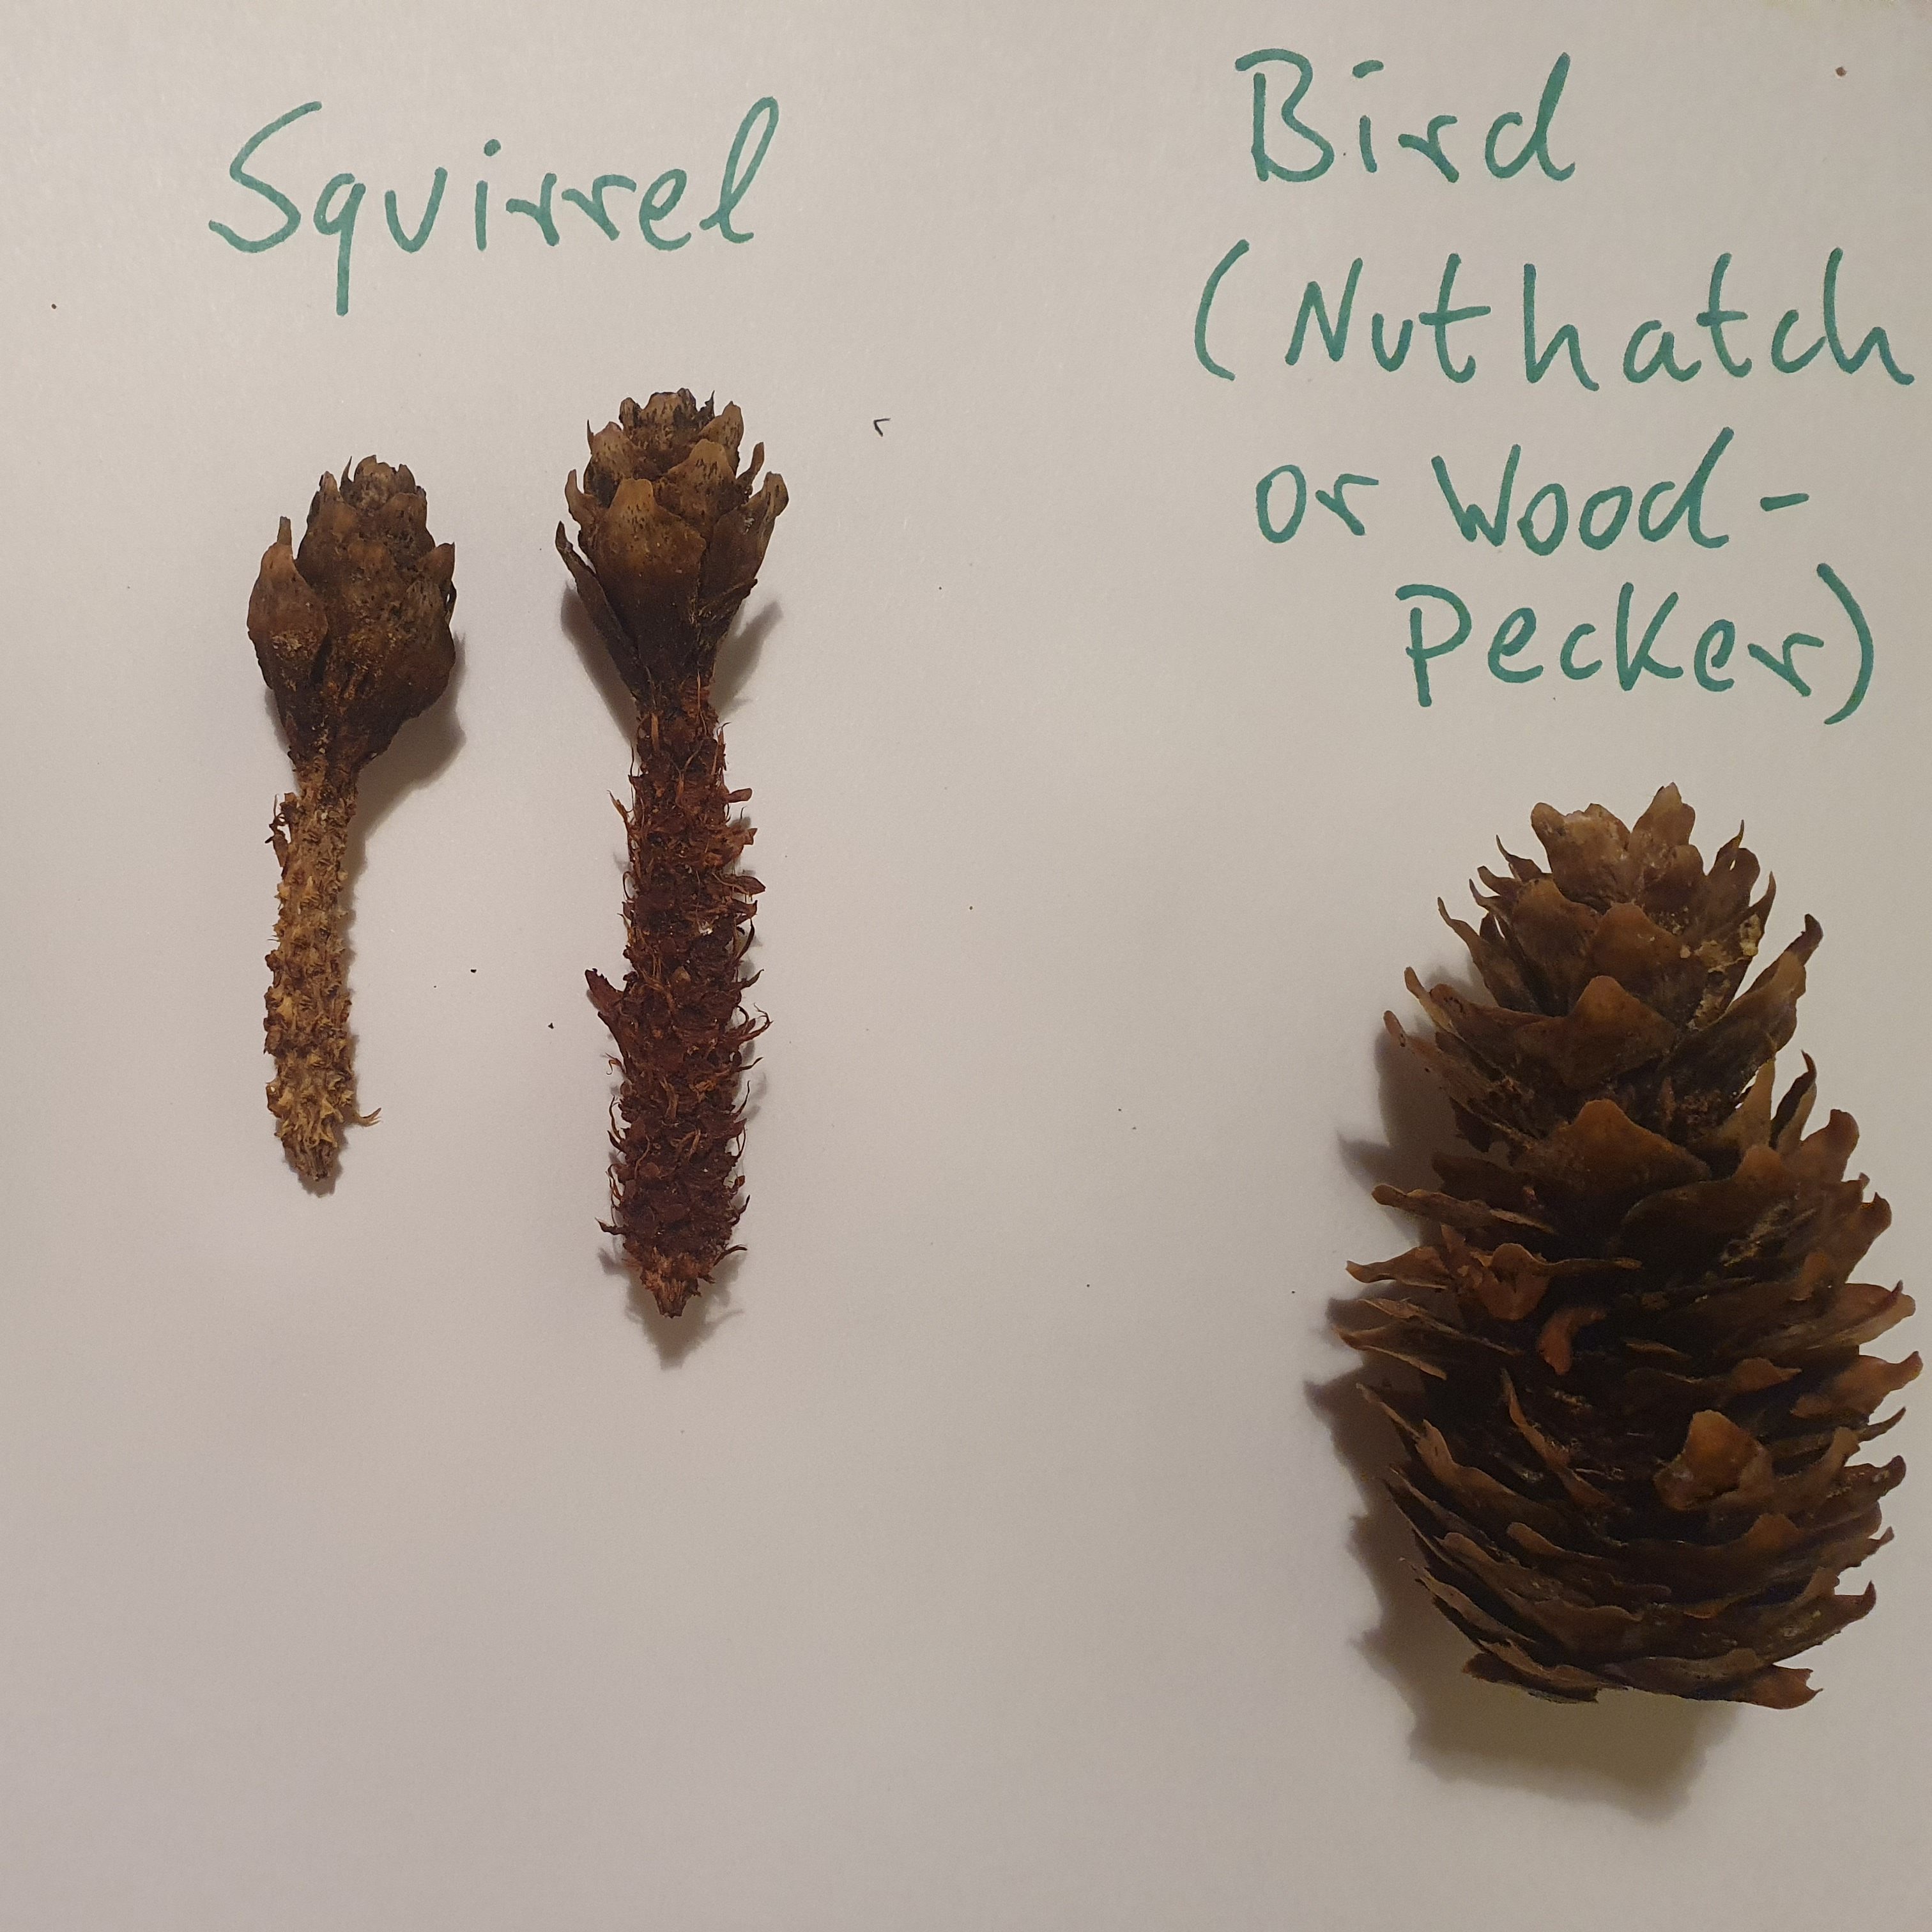
A squirrel leaves quite a tidy cone behind. It holds the cone and nibbles off the scales one by one. When it is finished, mostly the middle part, called the core, is left. Squirrels normally leave some scales at the tip of the cone where they have been holding it. The image below shows a cone left by a squirrel under a tree. You can even see some scales around it on the ground.

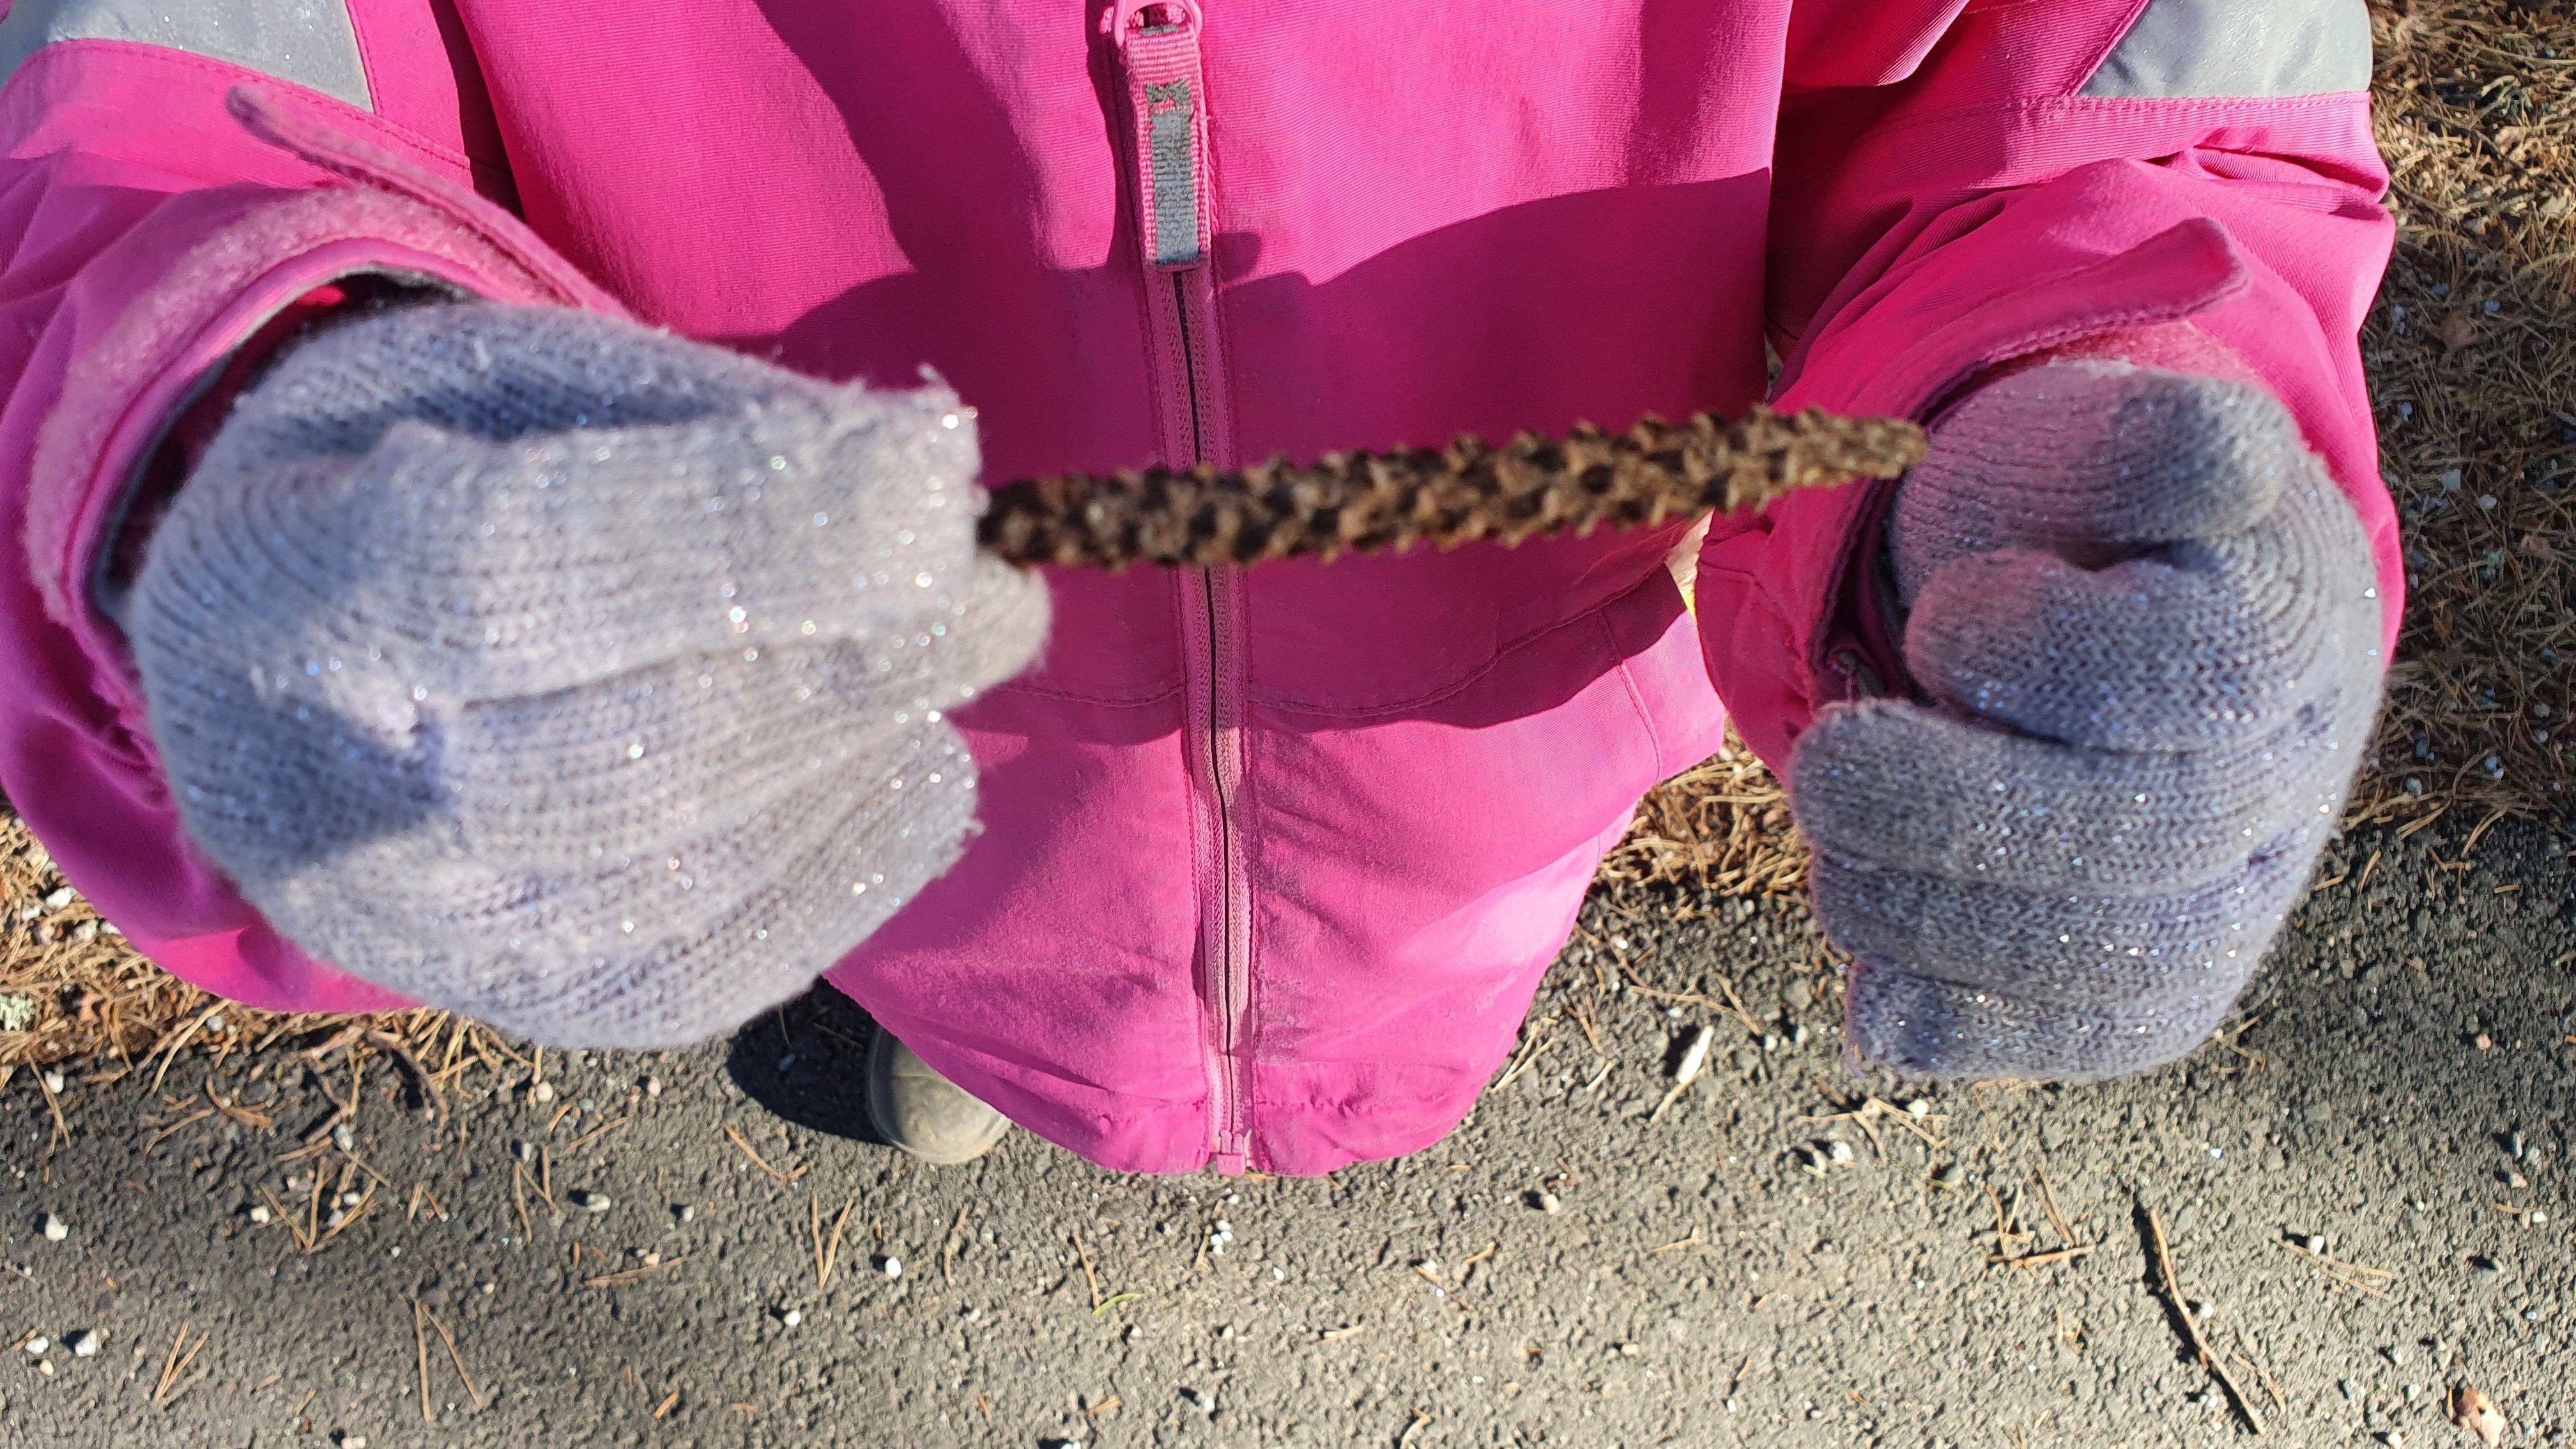
A wood mouse eats in a different way. It strips the cone of every last scale and only the clean core is left, which may almost just look like a stick which can be seen in the image below.

Birds like woodpeckers and nuthatches have a special way of eating cones. They often wedge the cone into a crack in the bark of a tree to hold it still. Then they peck at it to get the seeds out. The cone may look pecked and broken, with rough marks. Sometimes you can even find the place in the tree where the cone was held, called a “cone anvil.”

So, a clean, stripped core is likely from a wood mouse, a cone with scales left at the top from a squirrel and a pecked cone, often near a tree crack, from a bird like a woodpecker or nuthatch.

Make your own rain gauge

Have you ever wondered how much rain falls from the sky? Scientists use a tool called a rain gauge to measure rain. You can make your own at home or at school. It is simple and fun.

What you need

  • An empty, clear plastic bottle
  • A pair of scissors
  • A ruler
  • Sticky tape
  • A waterproof marker pen

What to do

  1. Cut the bottle.
    Ask an adult to help you cut the top part off the plastic bottle.
  2. Mark the ruler lines.
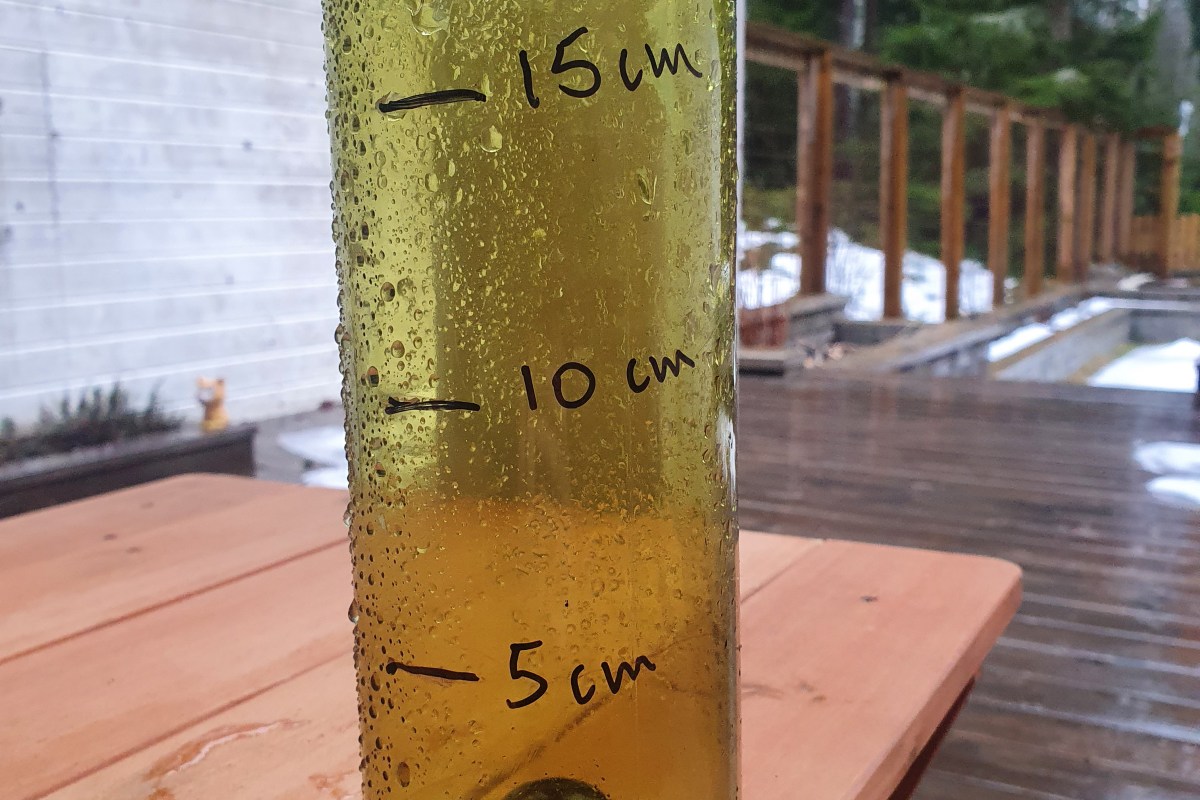
    Use the ruler and marker pen to draw lines up the side of the bottle. These lines will help you measure the rain.
  3. Optional: Turn the top upside down.
    Place the cut top of the bottle upside down like a funnel. Use sticky tape to hold it in place.
  4. Tape the edges of the bottle. Place sticky tape around the edge at the top of the bottle. This is done because the edge is quite sharp to avoid cutting yourself.

How to use your rain gauge

  • Put your rain gauge outside in an open space.
  • Make sure it is not under a tree or roof.
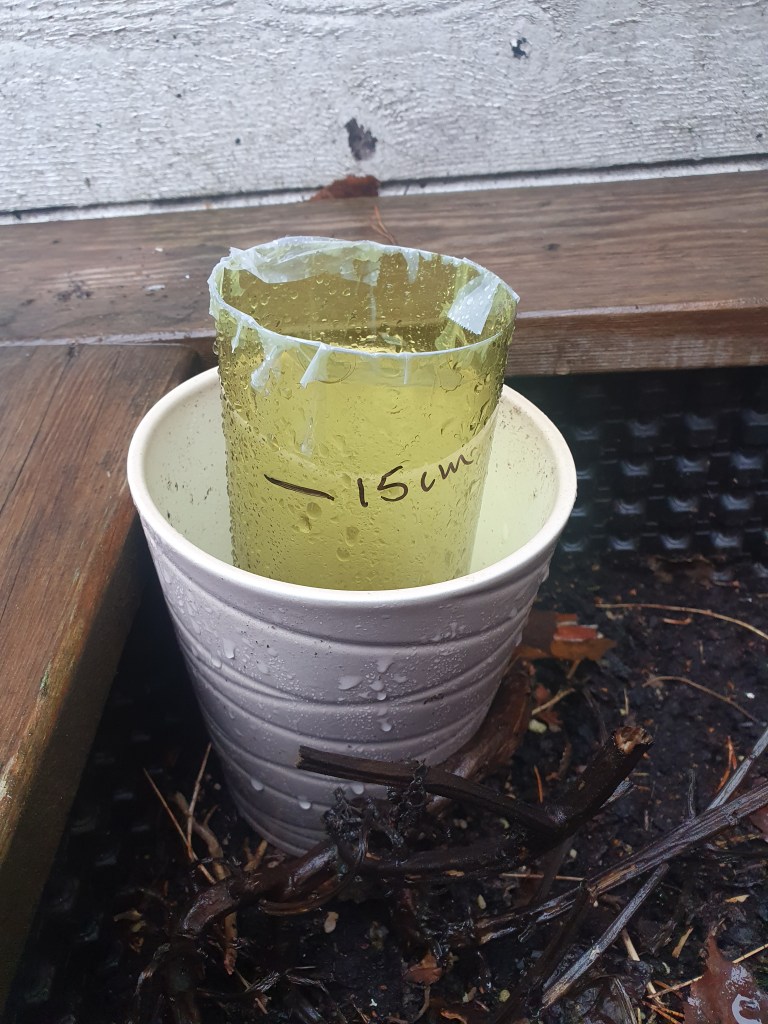
  • Make sure that the rain gauge cannot easily be blown away by the wind, e.g. place it inside a flowerpot or dig a small whole where you can place the rain gauge. See image below for an example.
  • After it rains, look at the water level.
  • Use the ruler marks to see how much rain has fallen.

Why this is interesting

Measuring rain helps us learn about the weather and how it changes. Farmers, gardeners, and scientists all use rain gauges to understand weather and climate change better.

You can check your rain gauge every day and keep a weather diary. This turns you into a real scientist!

Example table for a weatehr diary

Day of the WeekType of WeatherAmount of Rainfall
Monday
Tuesday
Wednesday
Thursday
Friday
Saturday
Sunday